
Today we will make a three-dimensional goat in the technique of right angle weave.
We will need the following materials:
- size 8/0 seed beads of four colors: the main color for the head, neck, body and legs (I made a few goats of different colors; a white one looks pretty good, but for the tutorial I chose seed beads of blue color to get contrastу photos), black color for the eyes and hooves, gray color for the horns and one red bead for the nose;
- a filler for the head and body (there are plenty different fillers: sintepon, holofiber, cotton wool, etc.; you can use any kind of filler you've got available);
- fishing line 0.3 мм (you may use any kind of thread for beadweaving you prefer to work with) and two beading needles.
Please note: this tutorial is of a middle-level difficulty.
The main technique that is used for making the goat is Right Angle Weave (RAW). We use it for making the goat's body and the most of its head.
The goat's legs and neck are made in the technique of Cubic Right Angle Weave (CRAW).
When making the goat's head we also use the elements of tubular peyote stitch.

Start making the goat from its body.
We need to make a rectangular parallelepiped having six faces: two side faces, the upper face (goats's back), the lower face (goat's tummy), the front face (goat's chest) and the back face (goat's rear side).
Either of the two opposite faces are the same. The number of the 4-bead units in the faces are as follows:
- in each side face - 5x3;


First, weave a beaded fabric consisting of 5x11 4-bead units.
You can follow this tutorial, it is a very detailed tutorial with step-by-step photos.

After that connect the top and the bottom edges of this beaded fabric together.
To do so follow this tutorial.


Next, weave the front and the back faces of the body. They consist of 3x3 4-bead units each.
Again, follow the second part of this tutorial and at first weave the front face.


At this stage fill the goat's body with the filler so that it could keep its shape.
Use as much filler as it is needed for the body to get a slightly round shape but at the same time it could still be squeezed.


At the next stages we will make the goat's legs, head and the tail.
Now make the legs.
For making them use the technique of Cubic Right Angle Weave (CRAW). You can learn this technique here.
For the base of the each leg choose the corner 4-bead units in the lower face of the body.

All the legs are identical, they consist of three cubes each.
Make the first two cubes out of the main color beads.


Put the goat's body aside for a while and start making its head.
The base of the head make in the same way as the body. At first weave a beaded fabric consisting of 3x7 4-bead units.


We've got the base of the head. Next we will make its front part using the elements of tubular peyote stitch.
You can learn this beading technique here.
For weaving the front part of the head we will use one end of the line only.
To help you distinguish different rows of beads in the photos I will use the beads of different colors.
But for the real item you should use the beads of the main color.
Start weaving. Pass any end of the line to the front side of the head so that it comes out from the extreme bead of any row edge in direction to the center.


Use as much filler as it is needed for the head to get a round shape, if you look at it from behind.
The next photo shows the back side of the head.


Now make the neck. Again, use the CRAW technique.
For the base of the neck choose any 4-bead unit that lies at a distance of one 4-bead unit from the back side of the head.


The following photos show the scheme of beads to which the eyes, ears and horns are connected.
Look at the goat's head from above and find the central line of 4-bead units.
Distinguish the two 4-bead units from either side of the axis: the 1st one adjoins the back side of the head and the 2nd 4-bead unit lies just in front of the 1st one.
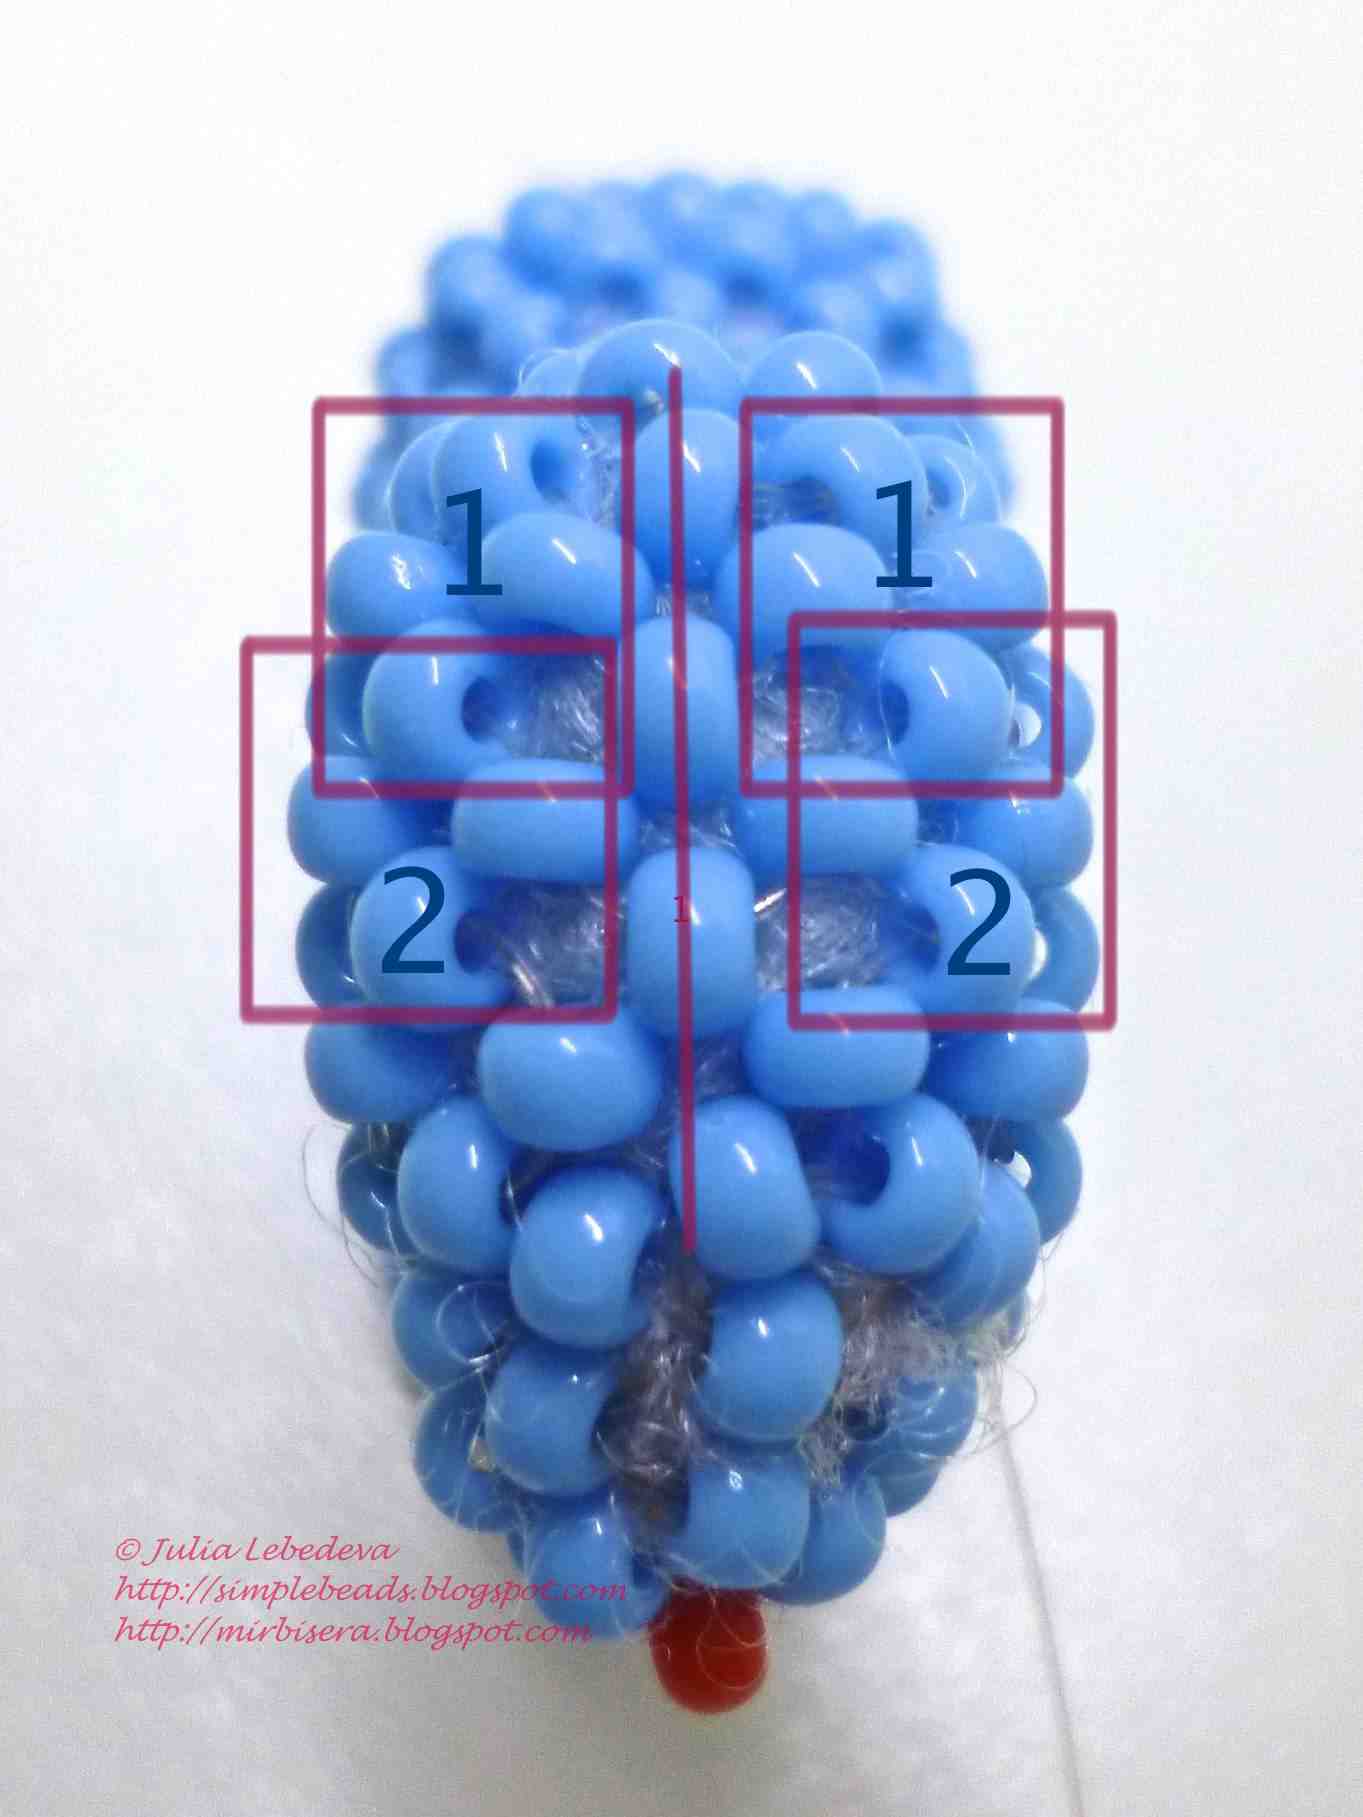
After distinguishing those 4-bead units, mark the beads needed for connecting the following items:
- either horn - to the backside bead of the 1st 4-bead unit (the place is marked with brown color);
- either ear - to the side bead of the 1st 4-bead unit (the place is marked with blue color);
- either eye - into the center of the 2nd 4-bead unit (the place is marked with black color).


Weaving is completed. Fix and cut off the remaining ends of the line.
The beaded goat is finished!

P.S. If you like this tutorial, share it with your friends on social networks using the buttons below the post.
Don't want to miss new tutorials? Subscribe for email notifications of site updates or follow us on Twitter!
No comments:
Post a Comment