To make this beautiful flower - a beaded tiger lily - we need:
- seed beads #11: orange, black, white, brown, light green and dark green;
- wire 0.3 mm in diameter (the more rigid the wire is, the better),
- green thread for stems winding.
At first we make petals of the flower out of orange and black beads. For each petal take a wire of 120 cm in length. Use the parallel weaving technique and adhere to the following scheme:
1st row: 1 orange bead;
2nd row: 2 orange beads;
3rd row: 4 orange beads;
4th row: 5 orange beads;
5th row: 4 orange beads, 1 black bead and 3 orange beads;
6th row: 10 orange beads;
7th row: 2 orange beads, 1 black bead, 4 orange beads, 1 black and 3 orange beads;
8th row: 11 orange beads;
9th row: 4 orange, 1 black, 2 orange, 1 black and 4 orange;
10th row: 2 orange, 1 black, 7 orange, 1 black and 3 orange;
11th row: 3 orange, 1 black, 2 orange, 1 black, 1 orange, 1 black, 2 orange, 1 black and 2 orange;
12th row: 1 orange, 1 black, 2 orange, 1 black, 2 orange, 1 black, 2 orange, 1 black and 3 orange;
13th row: 5 orange, 1 black, 3 orange, 1 black and 4 orange;
14th row: 1 orange, 1 black, 2 orange, 1 black, 2 orange, 1 black, 2 orange, 1 black, 1 orange, 1 black and 1 orange;
15th row: 2 orange, 1 black, 2 orange, 1 black, 1 orange, 1 black, 2 orange, 1 black and 2 orange;
16th row: 2 orange, 1 black, 3 orange, 1 black and 6 orange;
17th row: 2 orange, 1 black, 1 orange, 1 black, 2 orange, 1 black, 1 orange, 1 black and 2 orange;
18th row: 4 orange, 1 black, 1 orange, 1 black, 1 orange, 1 black and 2 orange;
19th row: 2 orange, 1 black, 1 orange, 1 black, 1 orange, 1 black, 1 orange, 1 black and 1 orange;
20th row: 2 orange, 1 black, 1 orange, 1 black and 4 orange;
21st row: 3 orange, 1 black, 2 orange, 1 black and 1 orange;
22nd row: 1 orange, 1 black, 1 orange, 1 black, 1 orange, 1 black and 1 orange;
23rd row: 1 orange, 1 black, 1 orange, 1 black and 2 orange;
24th row: 1 orange, 1 black, 1 orange, 1 black and 1 orange;
25th row: 2 orange, 1 black and 1 orange;
26th row: 3 orange beads;
27th row: 2 orange beads;
28th row: 1 orange bead.
We need to make 6 such petals for one flower.
Then we make leaves. For each leaf take a wire of 100 cm in length and green beads of two tones - light and dark. For simplicity, I'll call them just light and dark. Use the parallel weaving technique and adhere to the following scheme:
1st row: 1 light bead;
2nd row: 2 light beads;
3rd row: 3 light beads;
4th row: 4 light beads;
5th row: 5 light beads;
6th row: 6 light beads;
7th row: 7 light beads;
8th row: 7 light beads;
9th row: 4 light beads, 1 dark bead and 4 light beads;
10th row: 1 light, 1 dark, 2 light, 1 dark, 2 light, 1 dark, 1 light;
11th row: 2 light, 1 dark, 2 light, 2 dark, 2 light, 1 dark, 1 light;
12th row: 2 light, 1 dark, 2 light, 2 dark, 2 light, 1 dark, 1 light;
13th row: 1 light, 1 dark, 1 light, 2 dark, 1 light, 2 dark, 1 light;
14th row: 1 light, 3 dark, 1 light, 2 dark, 1 light;
15th row: 1 light, 1 dark, 1 light, 1 dark, 1 light, 2 dark, 1 light;
16th row: 1 light, 1 dark, 1 light, 3 dark, 1 light;
17th row: 5 dark, 1 light;
18th row: 5 dark, 1 light;
19th row: 5 dark beads;
20th row: 4 dark beads;
21st row: 4 dark beads;
22nd row: 3 dark beads;
23rd row: 1 dark bead.
I made 2 such leaves but you may make as many leaves as you wish.
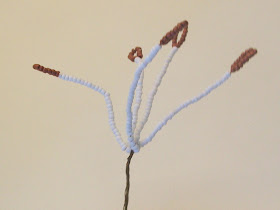
Now we will make stamens. Take a wire of 30 cm in length and string 15 brown beads onto it, placing them on the middle of the wire.
One end of the wire pass through the extreme bead at the opposite end of the wire.
Tighten the wire.
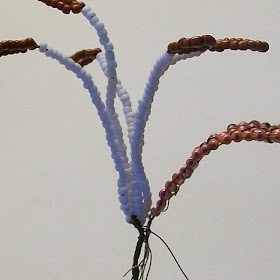
Then fold together both ends of the wire and string 30 white beads on them. One stamen is ready.
We need to make 5 such stamens for one flower.
Now let's assemble the flower. Take all the stamens and twist them together one by one.
Then fasten petals, placing them in a circle around the stamens. Use an extra piece of wire to fasten the petals to the stamens. This extra piece of wire will help you to make the flower more smooth and will also provide an additional rigidity to the stem.
As soon as you have fasten all the petals continue winding the stem by an extra piece of wire for a while.
Then take a green thread and wind it round the stem below the bud for the length of 5 cm or more.
Then fasten the leaves closely to the stem of the flower. If necessary, you can also use an extra wire.
When you have fasten all the leaves continue winding the stem by a green thread to the bottom.
Now fix the thread by making a knot, trim the excess wires and straighten the petals.
A beaded tiger lily is ready!
P.S. Don't want to miss new tutorials? Subscribe for email notifications of site updates!
If you like this tutorial, share it with your friends on social networks using the buttons below the post.


I just discovered your site through a link from "Ruby's". This lily is just beautiful! Thank you so much for sharing.
ReplyDeleteThank you for appreciation of my work. I will be very grateful if you share the tutorials that you like with your friends on social networks:-) Stay tuned with us!
Delete