Pages
▼
Monday, October 26, 2015
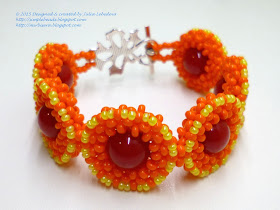
‘Autumn colors’ bracelet
Today we will make a bracelet out of seed beads of two sizes and large round beads. I called it the ‘Autumn colors’ bracelet. To make this bracelet, we will use the beading technique of cubic right angle weave (CRAW).
We will need:
- 12 mm round beads of red color,
- size 8 Czech seed beads of orange color,
- size 10 Czech seed beads of yellow color,
- clasp for a bracelet,
- nylon fishing line 0.25 mm thick and one or two beading needles (depends on the stringing method you use for making CRAW).
To weave the bracelet you can use any preferred CRAW method. For novice beaders I recommend to use a single thread stringing method because this method is more simple for understanding. Though as for me, I usually use a double thread stringing method of CRAW.
Also, you should know how to link two parts of the CRAW rope together; you can learn such a technique here.
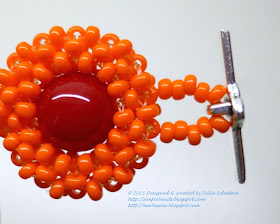
This bracelet consists of circular basic elements, connected together. The each basic element has a large round bead in its center.
Please note: as the basic elements of the bracelet are large enough (2.5 cm in diameter) you should adjust the length of the bracelet not only with the quantity of such elements, but also adjusting the length of the connecting elements with which the parts of the clasp are attached to the bracelet (also considering the actual size of the clasp).
Start weaving. To make a basic element take a line 150 cm long and at first, using orange seed beads, weave a CRAW rope of 13 cubes.
Then bend the beaded rope so that both its ends are positioned close to each other and, using 4 additional orange seed beads, connect both ends of the beaded rope together.
Weave through all the beads in the new 4-bead units of the ‘connecting’ cube at the each of four sides of the beaded rope.
The circular part of the basic element is completed. Now we should attach a large round bead in the center of it.
Choose any seed bead that lies in the central inner circle of this element (there are 14 such seed beads; choose any of them).
Then find the opposite seed bead in the same central inner circle and attach a round bead between those two seed beads.
In this way make one after another the needed quantity of basic elements. To get the bracelet of the required length I made 6 such basic elements.
After that connect successively all the basic elements to each other. Each time use 4 additional orange seed beads for making a ‘connecting’ cube between two basic elements. Don’t forget to weave through all the beads in the new 4-bead units of the ‘connecting’ cube.
In this way connect successively all the basic elements to each other so that they are located on the same line (the axis of the bracelet). At the same time the rotation axis of the round bead in the each basic element should be perpendicular to the axis of the bracelet.
Now attach the clasp. First, at any end of the bracelet choose two seed beads that lie in the central outer circle of the extreme basic element above and below the axis of the bracelet.
Then attach one part of the clasp to those seed beads. Use as many orange seed beads for attaching the clasp, as it is needed for adjusting the total length of the bracelet.
Next, in the same way attach another part of the clasp at the other end of the bracelet.
Now we should decorate the bracelet with small yellow seed beads. Before we proceed, choose the front side of the bracelet (because we should decorate just this side). It is especially important if the clasp of the bracelet has a different look from different sides.
Pass the line through the beads so that it comes out from the outer seed bead of any 4-bead unit on the front side of the basic element, then string 2 yellow seed beads and pass the line through the outer seed bead of the next 4-bead unit.
Thus decorate the entire circumference of the basic element. At the each step add two yellow seed beads between two orange seed beads on the edge of the basic element.
In the same way decorate with yellow seed beads all the other basic elements of the bracelet.
After that secure and trim all the excess ends of the line.
The bracelet is finished!
Using similar technique, you can also make earrings that match this bracelet and thus get a lovely beaded jewelry set.
P.S. If you like this tutorial, share it with your friends on social networks using the buttons below the post.
Don't want to miss new tutorials? Subscribe for email notifications of site updates or follow us on Twitter!


No comments:
Post a Comment