
To make a beaded young chicken we will need:
- Czech seed beads of three colors: yellow (of #10 size), red (also of #10 size) and black (of #8 size);
- white sequins of 5 mm in diameter;
- nylon thread and a needle for beading;
- rubber ball of 25 mm in diameter.
First of all you should choose the base for the chicken’s body. For such a base I used a rubber ball of 25 mm in diameter, but you may use any other base, for example, a small wooden or plastic egg.

Cover this base with yellow seed beads using the square stitch bead weaving technique (while making it you can follow this tutorial).

The top of the ball you should fully cover by beads,

and at the bottom you can bead till the level at which the chicken can stand on the last row of beads.

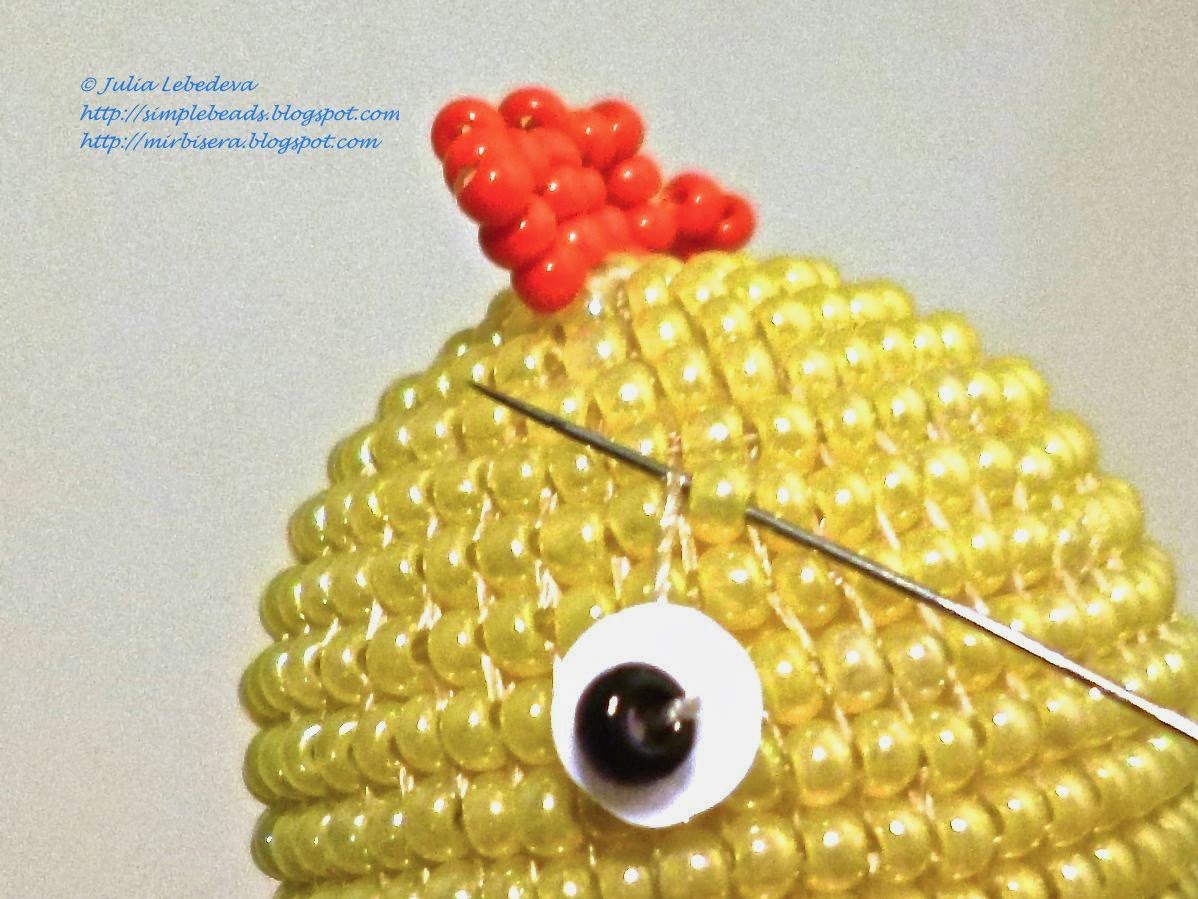
Next, make a chicken’s comb. Lead the thread out so that it came out at the 3rd row from the chicken’s top.

String 3 red beads onto the thread.

Hold the last red bead and pass the needle through the other 2 red beads in the opposite direction.

Move all the red beads close to the body and tighten the thread.

Then pass the needle from the reverse side through the yellow bead from which the thread is coming out at the moment,

and after that pass the needle upwards through the next two red beads.

Tighten the thread.

Then string 5 more red beads onto the thread.

Pass the needle through the nearest yellow bead at the 2nd row from the chicken’s top on a straight line to the center,


and then again pass the needle upwards through the next two red beads.


In the same way successively add to the comb three more segments of 5 red beads. Each time attach the segment of red beads to the yellow bead on a straight line at the next row.

Weaving of the comb is completed. To fasten the thread pass the needle backwards through the last red bead of the comb

and after that fasten the thread in an ordinary manner between the beads of the chicken’s body (if you want you can lead the thread out to the point at which any of the next stages of weaving begins).
The finished comb looks like this:
Side view:

Front view:

Next, make eyes. I attached them in the 7th row from the chicken’s top (it's about a third of the distance from the top to the bottom of the chicken) at a short distance from each other symmetrically relative to the comb.
To make an eye lead the thread out to the place where you are going to attach the eye, string onto the thread a sequin (its convex side to the chicken) and a black bead,

pass the needle through the sequin in the opposite direction

and then attach the eye to the body of the chicken.

So one after another make two eyes.

Next, make chicken’s wings out of yellow beads. Lead the thread out to the side of the chicken so that it came out in the middle row below the beginning of the chicken’s comb.

String 15 beads onto the thread,

move from the bead from which the thread is coming out at the moment by 1 bead downwards and 1 bead backwards and attach the thread to the chicken’s body.


Then pass the needle in the opposite direction through the 6 last beads out of 15.


Then string 9 more beads onto the thread and again move by 1 bead downwards and 1 bead backwards from the bead that was used for attaching the previous segment and attach the thread to the chicken’s body.

After that again pass the needle in the opposite direction through the 6 last beads out of 9.


Then string 9 more beads onto the thread, move again by 1 bead downwards and 1 bead backwards, attach the thread to the chicken’s body, fasten it and cut it off.

One wing is finished.

In the same way make another wing at the opposite side of the chicken.

Next, make the beak. At first weave it out of red seed beads on a separate segment of a thread using the parallel beading technique and the following pattern:
1st row: 1 bead,
2nd row: 2 beads,
3rd row: 3 beads,
4th row: 3 beads,
5th row: 2 beads,
6th row: 1 bead.
Lead out both ends of the thread so that they came out from both sides of the 4th row.

Then attach the beak to the body of the chicken. The 4th row of the beak attach to the middle row of the body


and the adjacent row of the beak consisting of 3 beads attach to the below row of the body.


Bend both parts of the beak towards each other

and fasten both ends of the thread. The beak is finished.
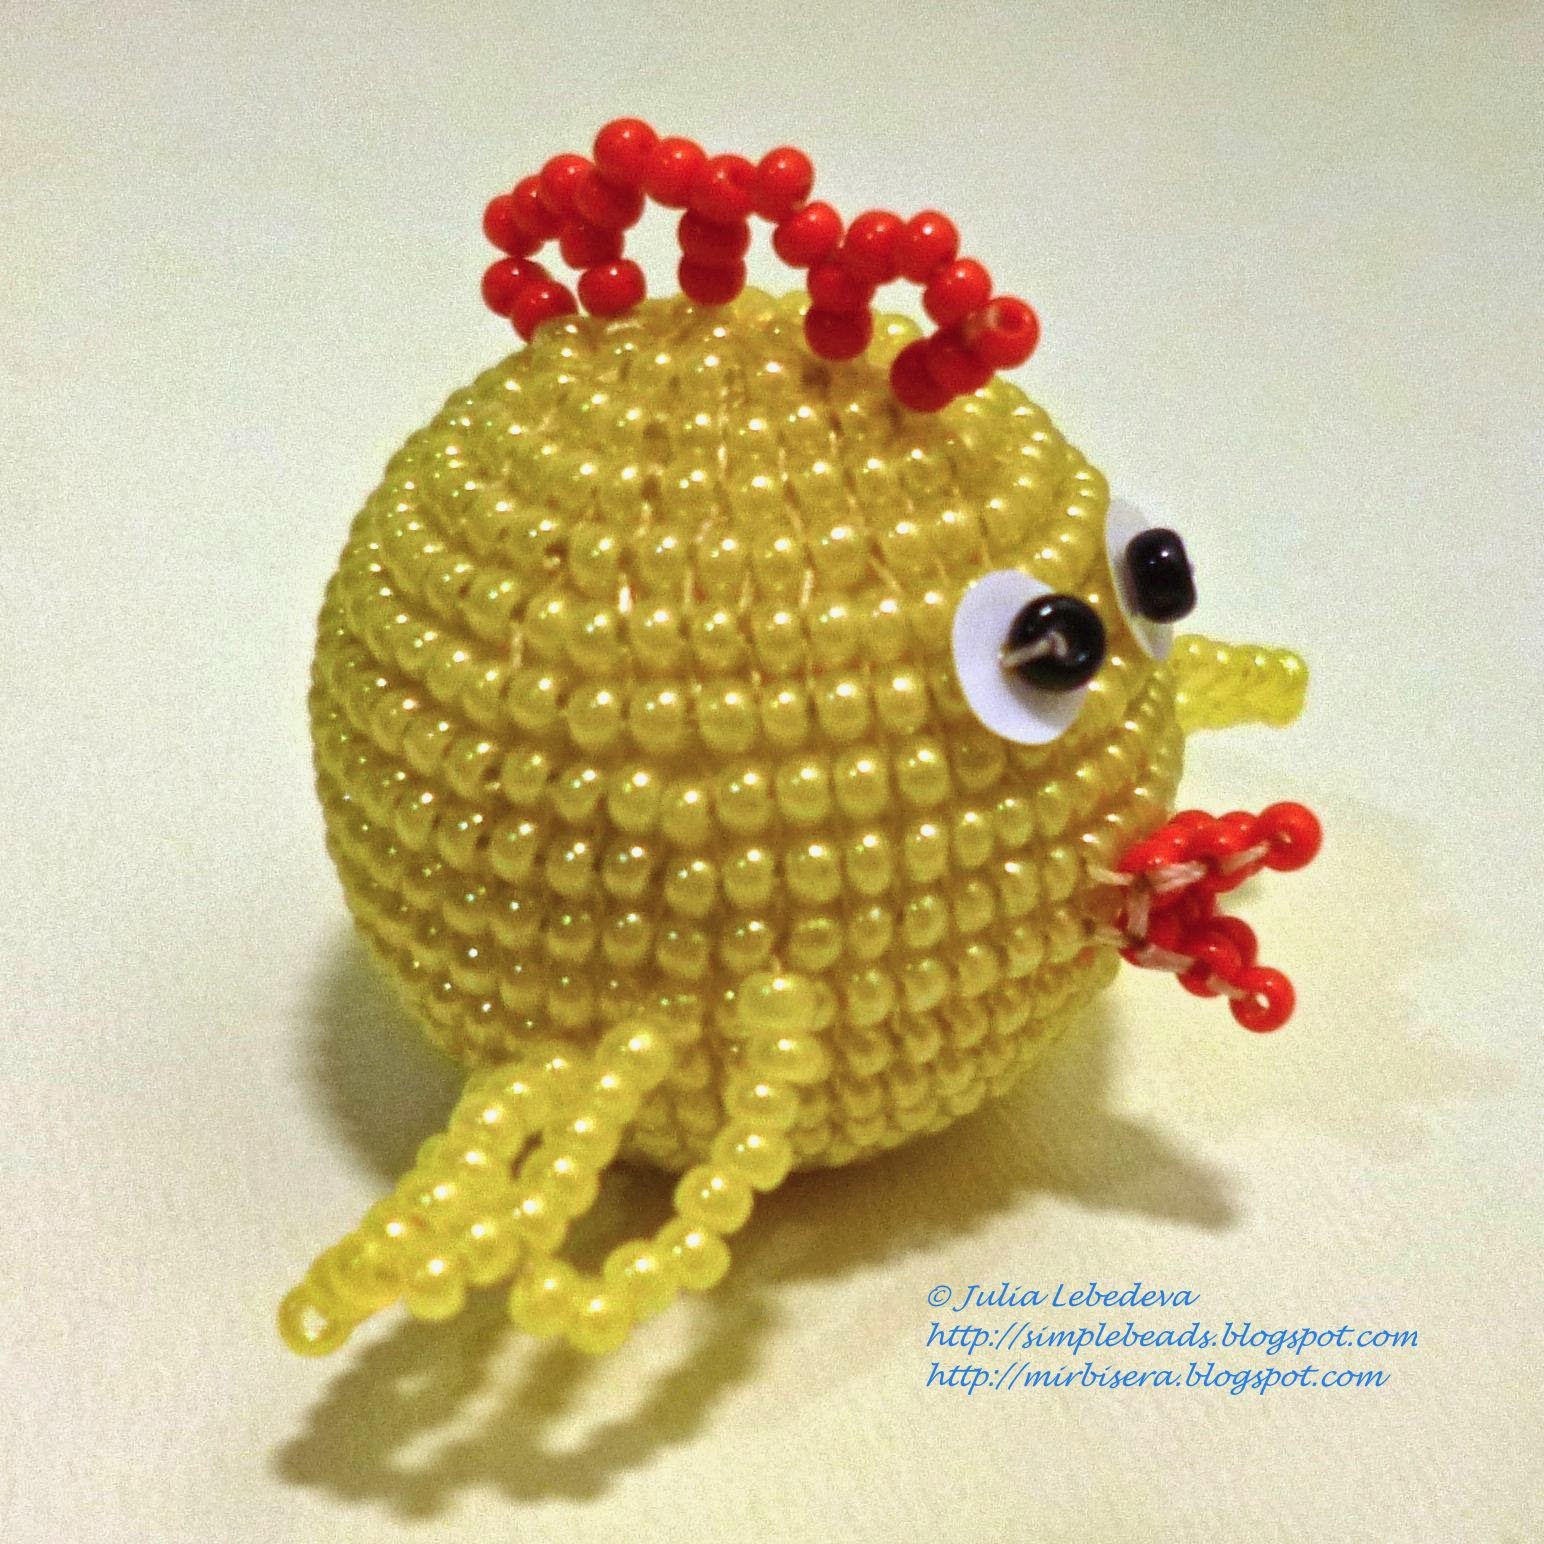
Next, make a tail of the chicken out of yellow beads. Lead the thread out so that it came out in the 3rd row from the bottom at a distance of 3 beads from the center of the chicken’s back.

String 8 beads onto the thread,

move from the bead from which the thread is coming out at the moment by 2 beads in the same row towards the center of the chicken’s back, attach the thread to the chicken’s body and pass the needle in the opposite direction through the 3 last beads out of 8.

Then string 5 more beads onto the thread, move again by 2 beads in the same row from the bead that was used for attaching the previous segment and attach the thread to the chicken’s body.

After that again pass the needle in the opposite direction through the 3 last beads out of 5.

Then string 5 more beads onto the thread, move again by 2 beads in the same row from the bead that was used for attaching the previous segment and attach the thread to the chicken’s body.

Fasten the thread - the tail is finished.


Now we should make shank with toes. To make them use the pattern that was used when we made hands of a snowman in this tutorial. Attach the shanks in the front of the body, in the 3rd row from the bottom so that the distance between them would be a little longer than the distance between the eyes.

The beaded young chicken is finished!

In our next tutorial you will learn how to make a mother hen for this chicken. There will be a real chicken family!
P.S. If you like this tutorial, share it with your friends on social networks using the buttons below the post.
Don't want to miss new tutorials? Subscribe for email notifications of site updates or follow us on Twitter!
No comments:
Post a Comment