
Today we will make a composition of two beaded things. They are a mouse and a piece of cheese. For making them we will use the technique of 3D beading on two segments of wire.
We will need the following materials:
For making a mouse
- size 8/0 seed beads of three colors: white (the main color), pink (for paws and tail) and black (for nose and eyes);
- wire 0.2 mm thick.
For making a piece of cheese
- size 10/0 seed beads of three colors: yellow (the main color), golden (for cheese "holes") and brown (for cheese "crust");
- wire 0.2 mm thick.
As I have already mentioned, for making both items we will use the technique of three-dimensional beading on two segments of wire.
The main idea of three-dimensional beading on two segments of wire is that the each row in the beadwork consists of four tiers: upper, lower, left and right. So, making a row we should first make the upper tier, then make the lower tier, after that make the left tier and at last make the right tier. It is very important to keep the order of tiers during the beading process.
We have already met such a beading technique so you can learn the basics of three-dimensional beading on two segments of wire in this tutorial, it is a very detailed tutorial with step by step photos.
In the beaded mouse the upper tiers of beads will form the upper part of the mouse's head and then its back, the lower tiers of beads will form the mouse’s neck and then its tummy, and the side tiers of beads will form the mouse’s sidepieces.

We will make the mouse using the following pattern:
 |
| Click to enlarge |
For the whole mouse with its ears and the tail we need two pieces of wire 100 cm long each.
Start beading.
Make the 1st and the 2nd rows:
The 1st row consists of one black bead only and each tier of the 2nd row consists of one white bead.
Take one piece of wire and string 1 black bead and 1 white bead. Place the beads on the middle of the wire. Hold the black bead and pass the end of the wire that comes out from that bead through the white bead (from its opposite side).
Tighten the wire trying its ends to be of equal length.
Then take another piece of wire and pass it through the black bead. String 1 white bead onto any end of that new piece of wire and pass its other end through that white bead (from its opposite side).
Tighten the new piece of wire trying its ends to be of equal length.
We've made the 1st row (black bead) and the upper and the lower tiers of the 2nd row (white beads).
Now at the each side between the upper and the lower tiers of the 2nd row make its left and right tiers, consisting of 1 white bead each.
In all the next rows make tiers successively: first make the upper tier, then make the lower tier, after that make the left tier and at last make the right tier.
Please note, if we look at the next rows a specific row has the same number of beads in the side tiers but the number of beads in the upper and the lower tiers may differ from each other.
Go on beading according to the pattern.
3rd row:
Upper tier - 2 white beads.
Lower tier - 2 white beads.
Left and right tiers - 1 white bead each.
4th row:
Upper tier - 3 white beads.
Lower tier - 3 white beads.
Left and right tiers - 2 white beads each.
5th row:
Upper tier - string beads in the following sequence: 1 white, 1 black, 2 white, 1 black and 1 white.
Lower tier - 4 white beads.
Left and right tiers - 2 white beads each.
6th row:
There are mouse's ears in the upper tier so at first string onto the wire 11 white beads (2 beads for the body and 9 beads for an ear).
Move the first two beads of the set close to the beadwork and pass this end of the wire through them from the beginning of the tier, then tighten the wire.
After that string onto the same end of the wire another set of 14 white beads (5 beads for the body and 9 beads for another ear).
Move the first five beads of the last set close to the beadwork and pass this end of the wire through the last two of them (from their opposite side). Then tighten the wire.
We've got a half-made upper tier of the 6th row consisting of 7 beads with two ears above them.
To complete the tier pass the other end of the wire through the 7 beads of the tier (doing so don't touch the beads that make up the ears).
Now tighten the wire. The tier is finished.
Continue beading the 6th tier.
Lower tier - 4 white beads.
Left and right tiers - 3 white beads each.
7th row:
Upper tier - 8 white beads.
Lower tier - 4 white beads.
Left and right tiers - 3 white beads each.
8th row:
Upper tier - 8 white beads.
Lower tier - 5 white beads.
Left and right tiers - 3 white beads each.
9th row:
Upper tier - 8 white beads.
There are mouse's legs in the lower tier so at first string onto the wire 4 white beads (2 beads for the body and 2 beads for a leg) and 4 pink beads (for a paw).
Move all the beads close to the beadwork and pass this end of the wire backwards through the last two white beads. Then tighten the wire.
After that string onto the same end of the wire another set of 4 white beads (2 beads for the body and 2 beads for the another leg) and 4 pink beads (for another paw).
Move all the beads of the last set close to the beadwork and pass this end of the wire backwards through the last two white beads. Then tighten the wire.
After that string onto the same end of the wire 2 more white beads.
Now we've got a half-made lower tier of the 9th row consisting of 6 beads with two forelegs.
To complete the tier pass the other end of the wire through the 6 beads of the tier (doing so don't touch the beads that make up the legs).
Tighten the wire. The tier is finished.
Continue beading the 9th tier.
Left and right tiers - 3 white beads each.
10th row:
Upper tier - 9 white beads.
Lower tier - 6 white beads.
Left and right tiers - 3 white beads each.
11th row:
Upper tier - 10 white beads.
Lower tier - 6 white beads.
Left and right tiers - 3 white beads each.
12th row is the same:
Upper tier - 10 white beads.
Lower tier - 6 white beads.
Left and right tiers - 3 white beads each.
13th row:
Upper tier - 11 white beads.
Lower tier - 6 white beads.
Left and right tiers - 3 white beads each.
14th row:
Upper tier - 11 white beads.
There are mouse's hind legs in the lower tier; this tier is the same as the lower tier of the 9th row (consisting of 6 beads and two legs between them).
Left and right tiers - 3 white beads each.
15th row:
Upper tier - 10 white beads.
Lower tier - 5 white beads.
Left and right tiers - 2 white beads each.
16th row:
Upper tier - 7 white beads.
Lower tier - 4 white beads.
Left and right tiers - 2 white beads each.
17th row:
Upper tier - 4 white beads.
Lower tier - 2 white beads.
Left and right tiers - 1 white bead each.
Beading of the mouse's body is almost completed.
We don't need the ends of the wire that come from the side tiers down any more so twist them together and cut them off. Put the tail wire inside the mouse's body or just bend it.
The 18th row consists of the upper tier only - 1 pink bead.
Next make the tail.
Choose the longer end of the remaining wire and string 20 pink beads. Hold the last stringed bead and pass this end of the wire backwards through the rest 19 beads. Move all the beads close to the body and tighten this end of the wire.
Beading is completed. Twist together and cut off the remaining wires.
The mouse is finished!


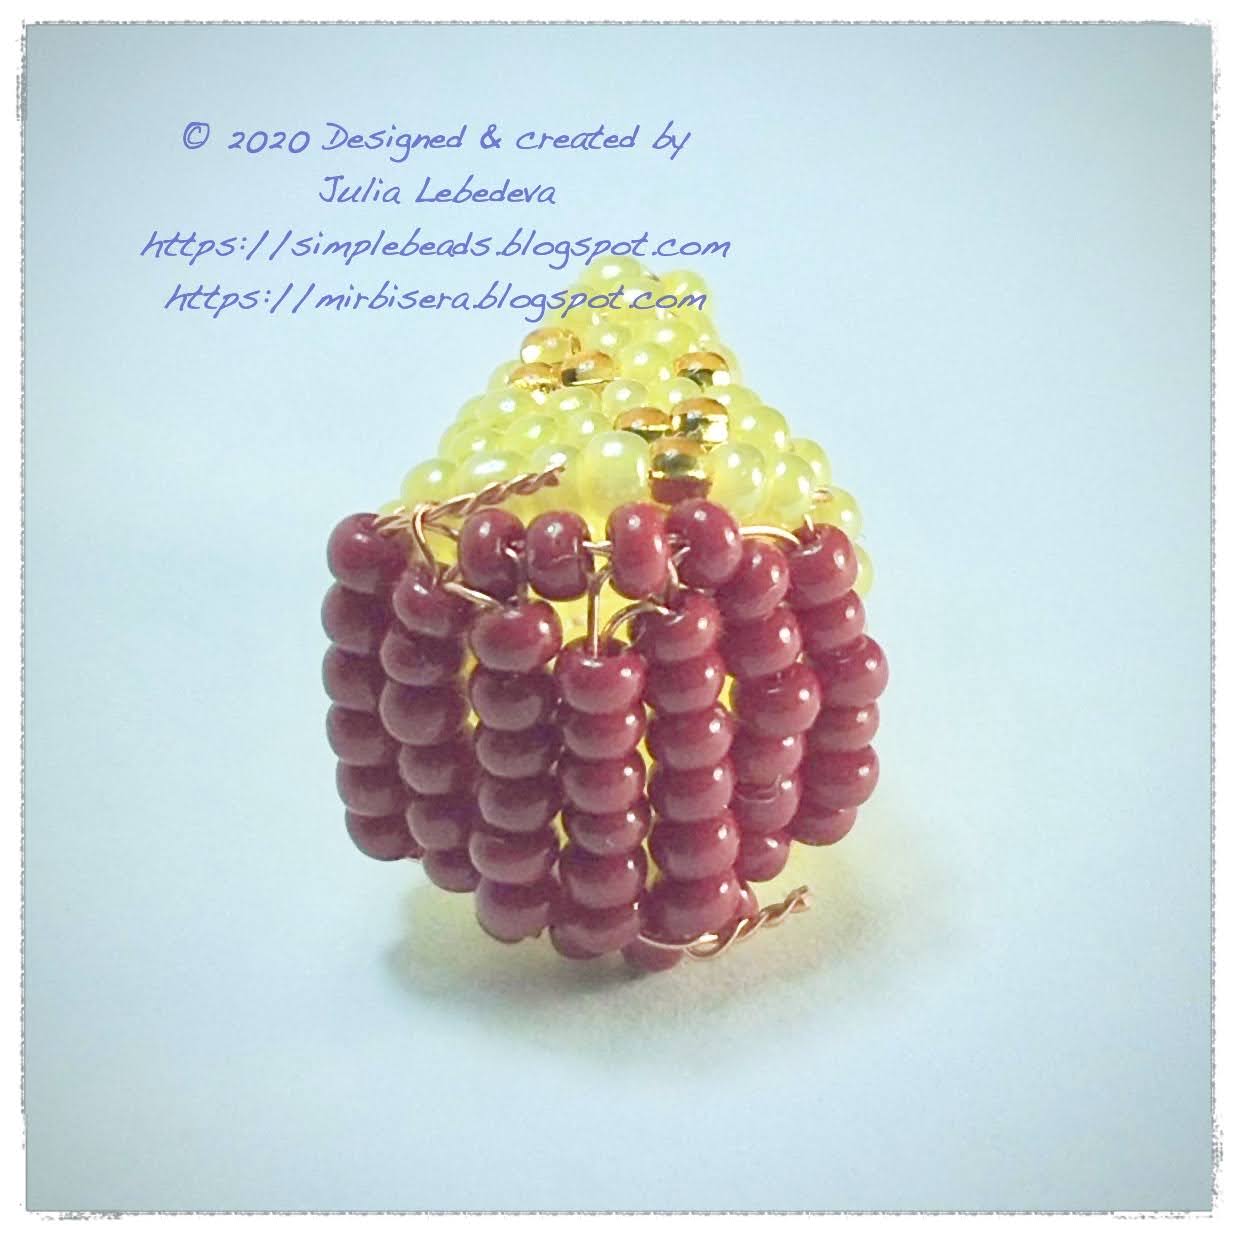
Next, we will make the cheese for the mouse.
We will bead this item as if it lies on one side. So when the beading process is over, the upper and the lower tiers of beads will become the side faces of the cheese, the left tiers will form its top face and the right tiers will form the bottom face.
Below is the completed item. The front part shows the right tiers.


We will make the cheese using the following pattern:
 |
| Click to enlarge |
Please note, for the main part of the cheese we use seed beads of two colors (yellow and golden) and the color pattern is asymmetrical. If you don't want to get confused always string beads onto the same end of the wire. For example, when you make the upper and lower tiers string beads onto the right end of the wire, and when you make the side tiers string only onto the upper end of the wire. To differ the tiers I made the right tiers without the color pattern, out of yellow beads only.
For making the cheese we need two pieces of wire 70 cm long each.
Start beading.
Make the 1st and the 2nd rows:
The 1st row consists only of 6 yellow beads and in the 2nd row there are all the four tiers.
Take one piece of wire and string 12 yellow beads (6 beads for the 1st row and another 6 beads for the upper tier of the 2nd row). Place the beads on the middle of the wire. Choose any of the wire's ends and pass it through the first 6 beads from the other end of the wire. Tighten the wire trying its ends to be of equal length.
Then take another piece of wire and pass it through the set of 6 beads without the ends of the first piece of wire comming out. String beads onto this new piece of wire in the following order: 4 yellow, 1 golden, 1 yellow and pass its other end through all these beads.
Tighten the new piece of wire trying its ends to be of equal length.
We've made the 1st row and the upper and the lower tiers of the 2nd row.
Now at the each side between the upper and the lower tiers of the 2nd row make its left and right tiers, consisting of 1 yellow bead each.
In all the next rows make tiers successively: first make the upper tier, then make the lower tier, after that make the left tier and at last make the right tier.
Please note, if we look at the next rows a specific row has 6 beads in the upper tier as well as in the lower tier; the number of beads in the side tiers is the same and that number increases from row to row.
Go on beading according to the pattern.
3rd row:
Upper tier - string beads in the following order: 1 yellow, 1 golden, 4 yellow.
Lower tier - string beads in the following order: 3 yellow, 2 golden, 1 yellow.
Left and right tiers - 2 yellow beads each.
4th row:
Upper tier - string beads in the following order: 2 golden, 4 yellow.
Lower tier - 6 yellow beads.
Left tier - string beads in the following order: 2 yellow, 1 golden.
Right tier - 3 yellow beads.
5th row:
Upper tier - 6 yellow beads.
Lower tier - string beads in the following order: 1 yellow, 2 golden, 3 yellow.
Left tier - string beads in the following order: 1 golden, 1 yellow, 2 golden.
Right tier - 4 yellow beads.
6th row:
Upper tier - string beads in the following order: 3 yellow, 1 golden, 2 yellow.
Lower tier - string beads in the following order: 1 yellow, 1 golden, 4 yellow.
Left and right tiers - 5 yellow beads each.
7 row:
Upper tier - string beads in the following order: 2 yellow, 2 golden, 2 yellow.
Lower tier - 6 yellow beads.
Left tier - string beads in the following order: 1 yellow, 2 golden, 3 yellow.
Right tier - 6 yellow beads.
8th row:
Upper and lower tiers - 6 yellow beads each.
Left tier - string beads in the following order: 2 yellow, 1 golden, 4 yellow.
Right tier - 7 yellow beads.
Making the basic part of the cheese is completed.
Now we need to make a cheese "crust" out of brown beads.

9th row:
Upper and lower tiers - 6 beads each.
Left and right tiers - 4 beads each.
There are no side tiers in the beadwork any more, we need to make only 5 horizontal tiers. To simplify the tutorial I will not use numbering neither for rows nor for tiers further on and will call all the next sets of beads as just "rows".
For further beading first use the ends of wire that come from the side tiers up.
Make on them another row out of 6 beads. Then pass either end of the wire through the nearest bead in the side tier of the 9th row.
After that make on these ends of the wire one more row out of 6 beads and again pass either end of the wire through the next nearest bead in the side tier of the 9th row.
At last, make on these ends of the wire another row out of 6 beads and leave them aside; we don't need these ends of the wire for beading any more.
Continue beading using the ends of wire that come from the side tiers of the 9th row down.
Make on them a row out of 6 beads, then pass either end of the wire through the nearest bead in the side tier of the 9th row. After that make the last row out of 6 beads.
Beading is completed. Fix and cut off the remaining wires.
The piece of cheese is finished!
Here are a few other its photos from different angles:
In the next photo the front part of the beadwork shows the lower tiers that make up a side face of the cheese.


P.S. If you like this tutorial, share it with your friends on social networks using the buttons below the post.
Don't want to miss new tutorials? Subscribe for email notifications of site updates or follow us on Twitter!
I am visual and I need the pictures like what you have for the oak.
ReplyDeleteSorry, but I haven't got the photos of the beading process. 3D beading on two pieces of wire isn't a simple technique. I think if don't understand the beading pattern you are just not prepared for that kind of beading technique. Our site has got a lot of detailed tutorials with step-by-step photos of 3D beading on one piece of wire. That kind of beading technique is more simple and easier for understanding. When you become familiar with simple 3D beading you will understand beading patterns for that kind of beading. And I recommend you to start 3D beading on two pieces of wire only after that. If you learn beading from simple items to more complicated ones, you will be surprised how little time it takes to go all the way. I wish you happy beading!
DeleteI just made a brown mouse yesterday! I enjoyed the process, but I will say I would have liked for the side pieces in feet rows to be included in the pattern for beaders like me, who just follow the image. Other than that - wonderful work :)
ReplyDelete