
Our site is intended primarily for newcomers to beading. Today, therefore, we will make one more very simple product - a cat in the plane-parallel technique of weaving. This cat is well suited, for example, for teaching beading to children.
We require the following materials:
- seed beads #8: grey for a body, one orange bead for a nose and two green beads for eyes;
- 50 cm of wire 0.3 mm in diameter.
We use the parallel weaving technique on a plane. At first we make the first row with ears. String one grey bead onto the wire and just after that string two more grey beads. Place all the beads on the middle of the wire.

Hold two extreme beads on one end of the wire and pass the other end of the wire through these beads.
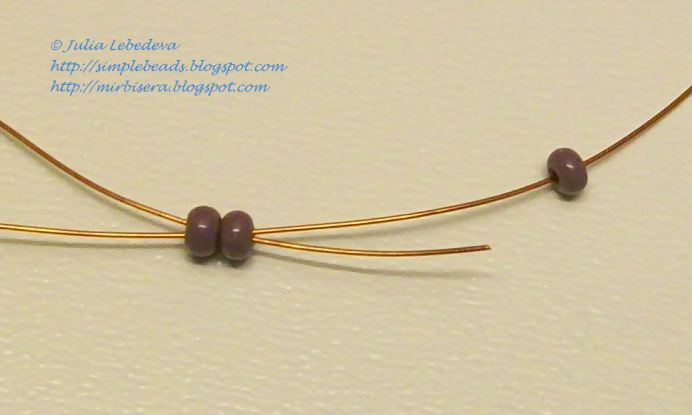
Tighten the wire. One bead has lain above the other two; this bead would be the cat's ear.

Next, string 4 grey beads onto one end of the wire.

Hold the last bead and pass this end of the wire through the next two (middle 2 of 4) beads. The direction of passing the wire is from the side of the first ear.

Move all the beads closely to the product and tighten the wire. We've got the first beads row with cat's ears.

For the second row string the beads onto either end of the wire in the following sequence: 1 grey, 1 green, 2 grey, 1 green, 1 grey.

Pass the other end of the wire through all these beads.

Tighten the wire, placing these beads below the first row. We've got the second beads row.

For the third row string the beads onto either end of the wire in the following sequence: 2 grey, 1 orange, 2 grey.

Pass the other end of the wire through all these beads.

Tighten the wire. The third beads row has lain below the second row.

The 4th row consist of 3 grey beads. String them onto one end of the wire and pass the other end of the wire through all these beads.

After that tighten the wire.

Similarly, make the 5th row, it consists of 4 gray beads.

Now make the cat's paws. String 5 grey beads onto either end of the wire.

Hold the last bead and pass this end of the wire through the other 4 beads in the opposite direction.

Move all the beads closely to the product and tighten the wire. We've got the first paw of the cat.

Make another paw on the other end of the wire: string 5 grey beads, then hold the last bead and pass this end of the wire through the other 4 beads in the opposite direction.

Move all the beads closely to the product and tighten the wire. We've got the second paw.

Next, make the 6th row, it consist of 4 grey beads.


The 7th and 8th rows are the same, we make them out of 4 grey beads each.


After the 8th row we make hind paws. They are the same as the front paws. First, make one paw on either end of the wire: string 5 grey beads, then hold the last bead and pass this end of the wire through the other 4 beads in the opposite direction.

Move all the beads closely to the product and tighten the wire.

Then make another same paw on the other end of the wire.

Now make the 9th row. It is the last row and we make it together with the tail. Choose the longer end of the wire and string 12 grey beads onto it.

Hold the last bead and pass this end of the wire through the 9 next beads in the opposite direction. Don't affect two beads that are the closest to the product.

Move all the beads closely to the product and tighten the wire.

Then string 2 more grey beads onto the same end of the wire.

Take the other end of the wire, pass it through the last 2 beads and just after that pass it through the first 2 beads of the 9th row.

Tighten the wire. We've got the last beads row with cat's tail.

We only need to fixate the wire. Pass either end of the wire through all the beads of the penult row.


Twist together both ends of the wire and cut them off.

Hide the tip among the beads rows.

Give a shape to the cat at your desire. I bent the tail and head in one direction from the body and the legs - in the opposite direction.
The beaded cat is ready!

P.S. Don't want to miss new tutorials? Subscribe for email notifications of site updates!
If you like this tutorial, share it with your friends on social networks using the buttons below the post.
thanks for post this cat. I am starting to learn beading and I love this cat, because it is easy, the explanation it is clear and the photos are perfect.
ReplyDeletea huge hug from colombia
Thanks for your comment, it is the first comment at my site. The site is still under construction and I'm going to post a lot of lessons. Stay tuned with us!
DeleteYou have a very good and thorough site for beading. I LOVE that it is geared towards beginners. Thank you!
ReplyDeleteLove it!! They are great and fun. We each made one in different colors.
ReplyDeleteThis is really great. It looks just very cute and I love this
ReplyDeleteThank you!