Sunday, February 28, 2016
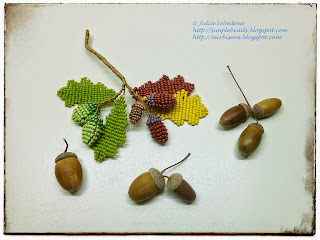
Oak twig with acorns
Today we will make a beaded oak twig with acorns.
We will need:
- size 8/0 seed beads: a few shades of brown, gray, yellow and green colors;
- wire 0.3 mm and 0.2 mm thick;
- brown thread.
For making acorns we will use the technique of three-dimensional beading on two segments of wire.
The main idea of three-dimensional beading on two segments of wire is that the each row in the beadwork consists of four tiers: upper, lower, left and right. So, making a row, we should first make the upper and the lower tiers and then make the left and the right tiers. It is very important to strictly keep the above mentioned order of tiers during the process of weaving.
So, to make an acorn, take seed beads of two colors (one for the acorn itself and the other for its cap) and two segments of wire 0.3 mm thick and 50 cm long each. We will start weaving from the bottom of the acorn and will finish at its cap.
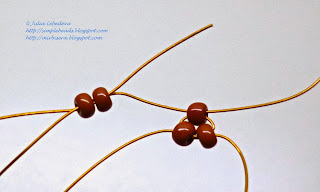
Start weaving using seed beads of one color. Take one segment of wire and string 3 beads on it. Place the set of beads on the middle of the wire.
Take any end of the wire and cross it through two extreme beads from the other end of the wire.
Tighten the wire trying to keep its ends of equal length. We’ve got two rows of beads. Let’s call the single bead as the 1st row of the beadwork and the next row of 2 beads - as the lower tier of the 2nd row. Place the beadwork on the worktable so that the lower tier of the 2nd row is situated below the 1st row.
Now take another segment of wire, pass it through the bead of the 1st row and even up its ends.
Then, using this new segment of wire, make a row consisting of 2 beads. When tightening the wire, try to keep its ends of equal length.
Place this new row above the bead of the 1st row. We’ll call it as the upper tier of the 2nd row.
After that using the ends of the wire from the left-hand side of the beadwork (originally they come from different segments of wire, but this fact doesn’t matter now) make one more row of 2 beads.
Tighten the wire. The new row has lain at the left-hand side between the upper and the lower tiers of the 2nd row. Thus we’ll call it as the left tier of the 2nd row.
In the same way using the ends of the wire from the right-hand side of the beadwork make the right tier of the 2nd row, consisting of 2 beads. Now we have got all the four tiers of the 2nd row.
Keep on weaving and make 4 tiers for the each next row. Be sure to follow the given order of weaving the tiers: first make the lower and the upper tiers and then make the left and the right tiers.
As the acorn in a cutaway view is round, all the tiers in a specific row should consist of the same quantity of beads.
So, in the 3rd row make 4 tiers of 3 beads each. First, make the lower tier,
then make the upper tier,
after that make the left tier
and complete the row by making the right tier.
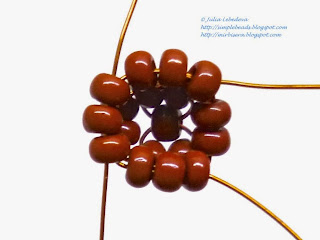
Side view at the beadwork at the current stage:
View from the starting point of weaving:
Continue weaving. The each tier of the 4th row consists of 4 beads.
5th row: 4 beads in the each tier.
6th row: 4 beads in the each tier.
7th row: 3 beads in the each tier.
View at the beadwork at the current stage. The lower tiers are on the front, left tiers are on the left and right tiers are on the right.
Now take seed beads of another color and proceed with making the acorn cap:
8th row: 4 beads in the each tier.
9th row: 3 beads in the each tier.
10th row: only 1 bead in the each tier.
Weaving of the acorn is completed. Twist together all the remaining wires.
View at the acorn from the side of the lower tiers:
Using this pattern, make a few acorns. I made 5 acorns in different colors, from green to brown.
Put the acorns aside for a while and proceed with making the oak leaves.
For the each leaf take a piece of wire 0.3 mm thick and 120 cm long.
Start weaving: string 6 beads and place them on the middle of the wire.
Take any end of the wire and cross it through the 4 extreme beads from the other end of the wire.
Tighten the wire trying to keep its ends of equal length. We’ve got two rows of beads: 2 beads in the 1st row and 4 beads in the 2nd row.
Now make the 3rd row. It consists of 6 beads.
Start making the 4th row of 6 beads,
then string 3 beads on one end of the wire and 17 beads on the other end of the wire.
Cross the end of the wire with less beads through the first 14 beads on the other end of the wire.
Tighten the wire. The 14 beads that are situated on both ends of the wire have made up the 5th row, and the rest 6 beads of the last set have complemented the 4th row (3 beads on the each side).
Make the 6th row of 12 beads,
and the 7th row of 10 beads.
The 8th and the 9th rows make simultaneously in similar two steps as the 4th and the 5th rows. First, make the base of the 8th row of 10 beads.
Then string 2 beads on one end of the wire and 18 beads on the other end of the wire.
Cross the end of the wire with less beads through the first 16 beads on the other end of the wire.
Tighten the wire. The 16 beads that are situated on both ends of the wire have made up the 9th row, and the rest 4 beads of the last set have complemented the 8th row (2 beads on the each side).
Continue weaving the leaf using the following pattern:
10th row consists of 14 beads,
11th row - 12 beads,
12th row - 10 beads,
13th row - 10 beads,
14th row - 12 beads,
15th row - 10 beads,
16th row - 8 beads,
17th row - 6 beads,
18th row - 4 beads,
19th row - 6 beads,
20th row - 4 beads
and the 21st row - 2 beads.
After that twist together both ends of the wire under the leaf.
If the finished leaf hasn’t turned to be tough enough you may sew it with a wire across the rows of beads. Take a wire 0.2 mm thick and 30 cm long, attach it to the center of the 1st row of the leaf
and then step by step sew together the rows of beads. While sewing the rows make sure the stitches run in the middle of the rows, on one side of the leaf only.
After sewing together all the rows of the leaf
trim the starting tail of the wire and twist its ending tail together with the basic wire under the leaf.
As I have already said the stitches should run on one side of the leaf only, thus they shouldn’t be seen on the other side of the leaf.
For the each oak twig make a few leaves. I made 4 leaves out of seed beads of different colors: yellow, green and brown.
Now start assembling the twig.
Take a brown thread and wind it round the wire under all the acorns and leaves for some distance.
After that twist together a few acorns to get a bunch of acorns
and then attach that bunch to a leaf or a couple of leaves. We’ve got a small twig.
To get a bigger twig, attach randomly other acorns and leaves at some distance from each other. At the same time wind the wire by a brown thread to simulate the bark. After using all the acorns and leaves complete winding the twig by a thread at its full length. Then secure the thread by making a knot and trim the excess wires. The beaded oak twig is finished!
P.S. If you like this tutorial, share it with your friends on social networks using the buttons below the post.
Don't want to miss new tutorials? Subscribe for email notifications of site updates or follow us on Twitter!
Subscribe to:
Post Comments (Atom)


No comments:
Post a Comment