
Today we will make a beaded rose bush.
We will need:
- size 10/0 seed beads of red and green colors;
- wire 0.3 mm thick.
First, we should make flowers out of red seed beads.
Take a wire 60 cm long and string 16 beads on it. Place the beads approximately on the middle of the wire.

Pass the right end of the wire through the leftmost bead in the opposite direction.

Tighten the wire. We've got a loop of beads.

Then choose the longer end of the wire and make another such a loop on it: string 16 beads on this end of the wire

and pass this end of the wire in the opposite direction through the first bead of the last set, then pull the wire.

Make 3 more such loops on the same end of the wire. We've got 5 such loops now.

Take another end of the wire and string 12 beads on it.

Pass this end of the wire through the bead that lies in the middle of the nearest loop.

Pull the wire.

String 5 more beads on the same end of the wire and pass it through the bead that lies in the middle of the next loop.

Pull the wire.

Repeat this step 3 more times: string each time 5 beads on the wire and pass it through the bead that lies in the middle of the next loop.

Then string 12 beads on the same end of the wire and pass it through the bead that lies at the base of the last loop.

Pull the wire.

Twist together both ends of the wire. We've got the first petal of the rose.

Curl this petal into a bud.


Then make another such a petal on a wire 60 cm long. The second petal is similar to the first one but we make each loop out of 18 beads instead of 16.

To make the outer circle, take 14 beads for the each extreme segment and 5 beads for the each medium segment.
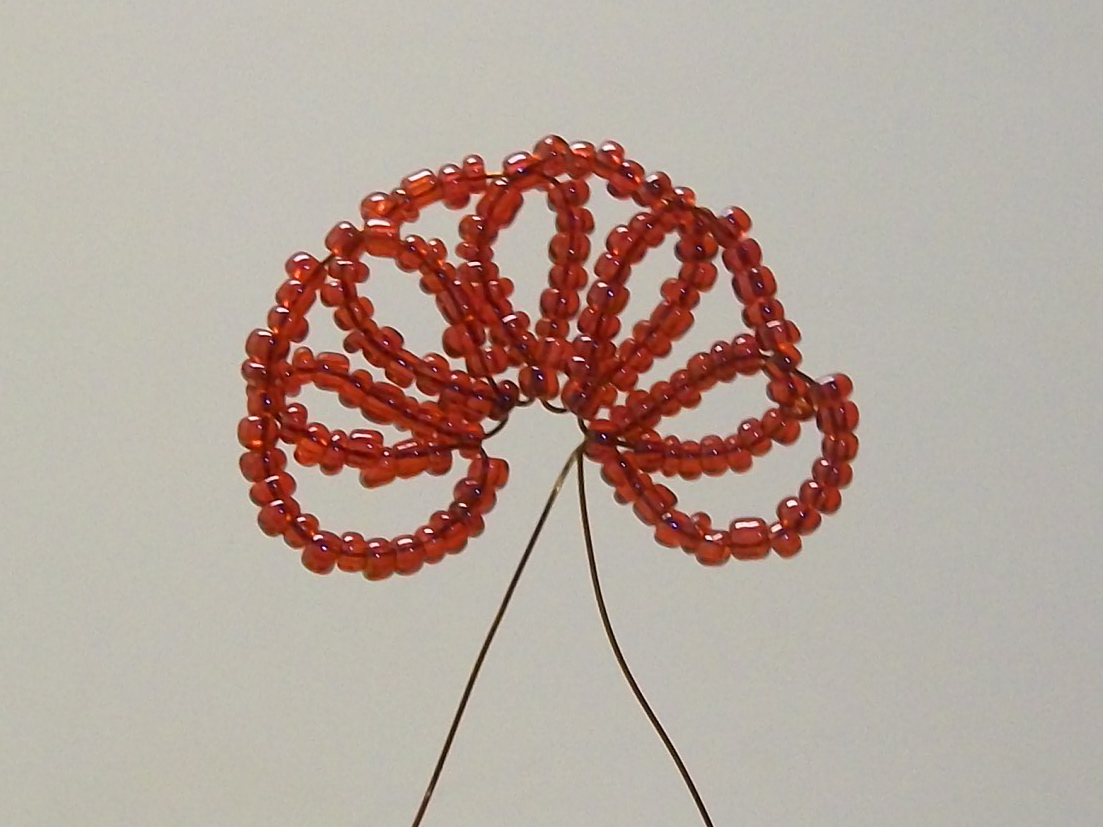
Twist together both ends of the wire. We've got the second petal of the rose.

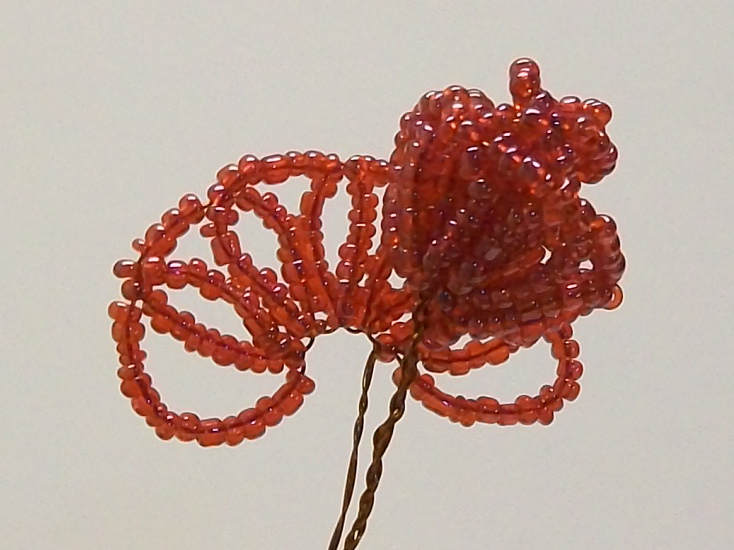
Take the initial bud and curl the second petal around it.


Then make the third petal. Take a wire 60 cm long and make on it 5 loops out of 20 beads each.

To make the outer circle, take 16 beads for the each extreme segment and 5 beads for the each medium segment.


Curl this petal around the bud.


Then make the last petal. Take a wire 70 cm long and make on it 7 loops out of 22 beads each.

To make the outer circle, take 20 beads for the each extreme segment and 5 beads for the each medium segment.

Twist together both ends of the wire

and pass them through the first arc on the opposite side of the petal.

Take the bud and insert it into the center of the forth petal.
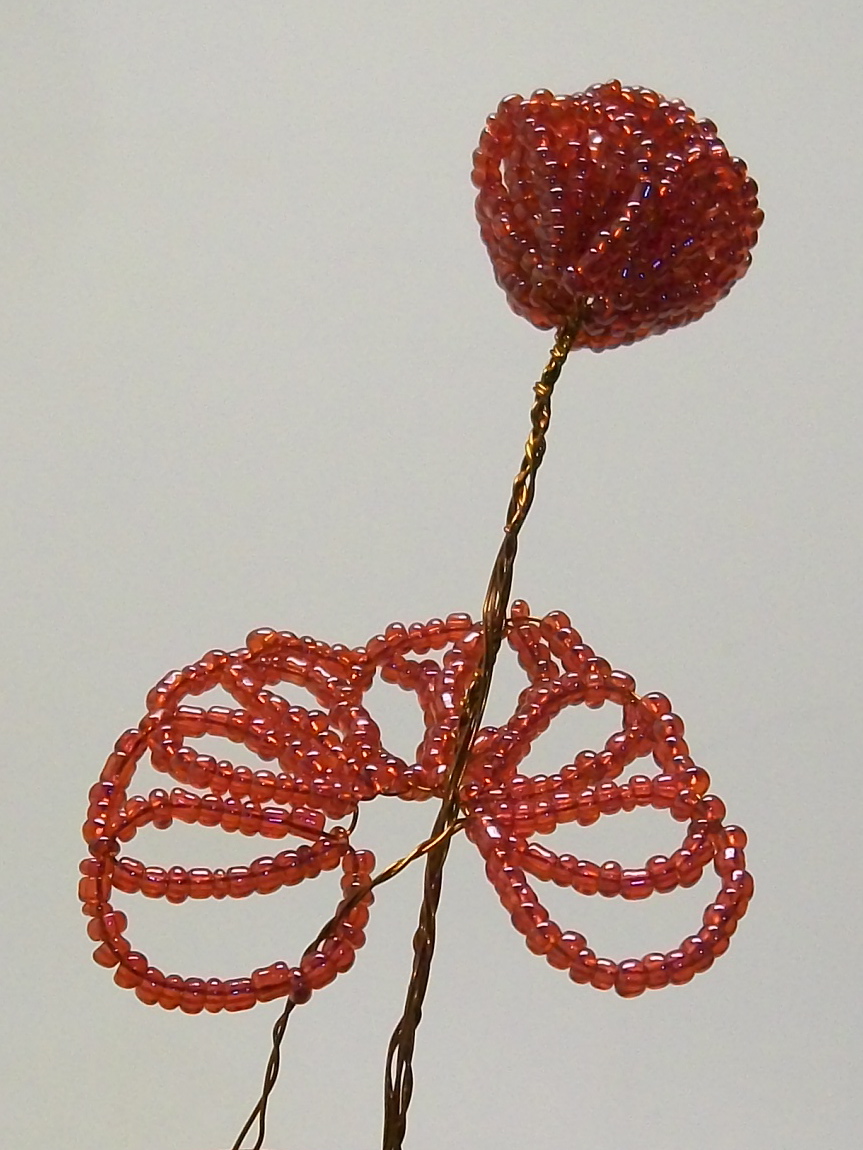
Then curl this petal around the bud. We've got a rose flower.


Now make sepals out of green beads. Take a wire 40 cm long and string 9 beads on it. Place the beads on the middle of the wire.

Take one end of the wire, hold the extreme bead from its side and pass this end of the wire in the opposite direction through the next bead.

Tighten the wire.

String 6 beads on the same end of the wire
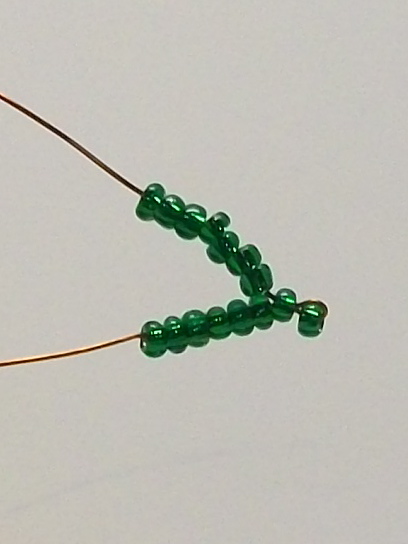
and then pass this end of the wire through the extreme bead on the other end of the wire.

Tighten the wire. We've got one sepal.

Continue doing sepals in the same way on both ends of the wire. Make 4 more sepals, 2 sepals on the each end of the wire.

Then take the sepals and twist them to the stem of the flower just below the bud.


To collect a bush of roses we should make at least 3 such flowers.

Then make leaves of roses. To make them, use French bead looping technique that is described in the tutorial on making beaded violets.
At first, make large leaves. They consist of two circles. Use the following pattern:
the middle - 14 beads,


the first circle - 17+17 beads,


the second circle - 21+21 beads.


The leaf is finished:

Make 4 such large leaves.

Then make small leaves. They also consist of two circles. Use the following pattern:
the middle - 10 beads,
the first circle - 13+13 beads,
the second circle - 17+17 beads.

As I have already mentioned, since the beads may slightly vary in size, the actual quantity of beads may differ from the indicated quantity. Don't worry about it and take as many beads as you need to make a nice leaf.
Make 8 such small leaves.

Weaving is completed. Now let's assemble the rose bush.
Take a few leaves and twist them together alternating large and small leaves and keeping for the each leaf an untwisted wire of approximately 3-5 cm long.

In this way make 3 sprigs out of all the available leaves (different sprigs may have different quantity of leaves). Then attach the each one to one rose flower.


Finally, combine all three flowers and twist together their stems at the bottom.


Now trim the wires and put the flowers into a pot or a vase.

Our rose bush is finished!

P.S. Don't want to miss new tutorials? Subscribe for email notifications of site updates or follow us on Twitter!
If you like this tutorial, share it with your friends on social networks using the buttons below the post.
This comment has been removed by the author.
ReplyDeleteHi, Julie! It was a good comment, why did you remove it? Don’t worry if your beaded product doesn’t look exactly the same as mine. It’s almost impossible to make two absolutely identical roses out of beads, so small differences can always be found. Don’t give up, be patient, make more beaded products and you’ll see that your experience in beading grows very quickly.
DeleteHello Julia,
ReplyDeleteI'm German, but you explain the pattern so good, that even I can understand it ;).I made this rose for my mother's birthday, and she loves it. Thank you very much!!!
Greetings, Franziska
P.S:Sorry for my bad English... :)
Hi, Franziska,
DeleteThanks for your appreciation of my work. I’m very glad that my tutorials are easy to understand and follow. I will be very grateful if you share the tutorials that you like with your friends on social networks:-)
Stay tuned with us!
If I am in a social Network, this will be the first thing I do!!
DeleteLG Franziska
Estimada Julia:
ReplyDeleteEres una persona muy bella, ya que compartes tu experiencia de manera simple y muy explicativa.
Agradezco tu generosidad y espero avanzar pronto. Todo es práctica cuando las instrucciones son tan buenas como las tuyas.
Saludos, Bárbara
Dear Bárbara,
DeleteThanks for your comment. I'm very glad that you like my tutorials. I hope, you will make many interesting things out of beads:-)