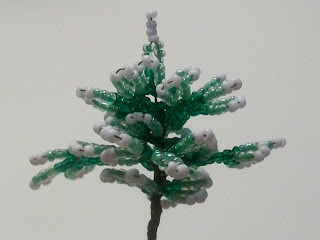
To make this beautiful product - beaded Christmas Tree, we need:
- beads #11:
white - 5 grams,
light green - 15 grams (for simplicity we shall hereinafter call light green beads just "light")
dark green - 15 grams (for simplicity we shall hereinafter call dark green beads just "dark")
- wire 0.3 mm in diameter, preferably of a dark color.
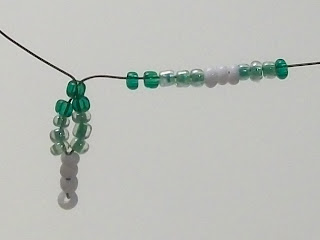
Take a wire of 50 cm in length and string on it 4 white beads.
Place the beads on the middle of the wire.
Hold the rightmost bead by hand and thread the right end of the wire through the remaining 3 beads in the opposite direction.
Tighten the wire.
Then string 3 light and 1 dark beads on the each end of the wire.
Fold together both ends of the wire and string 1 dark bead on them.
Tighten the wire.
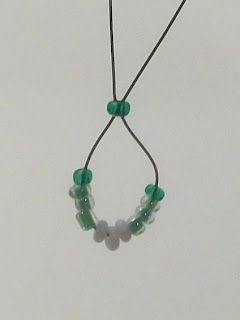
String on one end of the wire beads in the following order: 2 dark, 3 light, 3 white, 3 light, 1 dark.
Thread this end of the wire through the first dark bead in the opposite direction.
Tighten the wire.
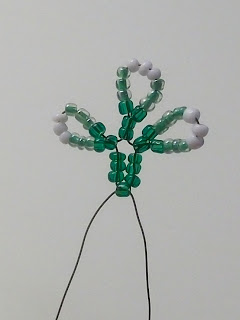
Do the same with the other end of the wire: string on it 2 dark, 3 light, 3 white, 3 light, 1 dark beads, and after that thread this end of the wire through the first dark bead in the opposite direction.
Tighten the wire.
Similarly, at the each end of the wire make another loop of beads.
Twist together the ends of the wire.
Bend the central ("sharp") loop of beads so that it would stand perpendicular to the plane on which the remaining loops of beads lie - thus forming the top of our Christmas Tree.
Leave aside the treetop and start weaving the other parts of the tree.
Take a wire of 40 cm in length and string on it beads in the following order: 2 dark, 3 light, 3 white, 3 light, 1 dark. Place the beads on the middle of the wire so that there were two dark beads at the left edge and one dark bead at the right edge.
Thread the right end of the wire through the leftmost dark bead in the opposite direction.
Tighten the wire.
Then make the same loop of beads on one end of the wire: string on it 2 dark, 3 light, 3 white, 3 light, 1 dark beads
and thread this end of the wire through the first dark bead in the opposite direction, then tighten the wire.
Make the same loop of beads on the other end of the wire.
Similarly, at the each end of the wire make another loop of beads. There are 5 loops of beads at the wire at now.
Do not twist together the ends of the wire.
We need to make such a part of our Christmas Tree in triplicate. Later we will tie them to the trunk of the tree between the rows of major branches, so let's call this part of the tree as "the middle section".
Then proceed to weaving of the major branches of the tree.
Step 1. Take a wire of 70 cm in length and string on it beads in the following order: 3 dark, 3 light, 3 white, 3 light, 1 dark. Place the beads on the middle of the wire so that there were three dark beads at the left edge and one dark bead at the right edge.
Thread the right end of the wire through two leftmost dark beads in the opposite direction.
Step 2. String on one end of the wire beads in the following order: 2 dark, 3 light, 3 white, 3 light, 1 dark.
Then thread this end of the wire through the first dark bead in the opposite direction and tighten the wire.
Step 3. Make the same loop of beads on the other end of the wire.
Step 4. String 3 dark beads on one end of the wire and 4 dark beads on the other end of the wire.
Thread the wire's end with a smaller number of beads through the last bead on the other end of the wire.
Tighten the wire - you've got a small twig of a tree.
We need to make 20 such twigs. At four of them twist together the ends of the wire.
Leave aside 4 ready twigs. Repeat the previous steps 2 - 4 at the each of 16 remaining twigs, i.e. add to them another layer of leaves.
Take four twigs and twist together the ends of the wire at the each one.
Repeat the previous steps 2 - 4 at the each of 12 remaining twigs, i.e. add to them one more layer of leaves.
Take five twigs and twist together the ends of the wire at the each one.
Once again repeat the previous steps 2 - 4 at the each of 7 remaining twigs, i.e. add to them one more layer of leaves.
Then twist together the ends of the wire at the each twig.
Weaving is completed. Now we need to assemble the product.
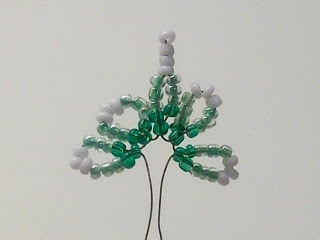
Take the treetop and 4 smallest twigs.
At the each twig bend the wire so that it would stand perpendicular to the plane of the twig.
Attach the twigs to the treetop one after another 5 mm below the treetop.
Take one middle section and tie it perpendicular to the trunk of the tree 5 mm below the previous branches.
Take four twigs of the next size and tie them to the trunk 5 mm below one by one.
Take another middle section and tie it perpendicular to the trunk of the tree 5 mm below the previous branches.
Take five next size twigs and tie them to the trunk of the tree 5 mm below.
Take the last middle section and tie it perpendicular to the trunk of the tree 5 mm below the previous branches.
Take the last 7 twigs and tie them to the trunk of the tree 5 mm below.
The Christmas Tree is almost completed. You just need to trim the excess wire and put the Christmas Tree onto the stand. I do it in a simple way: take a small cap,
unbend the edges of the wire in opposite directions so that they form a circle, equal to the inner size of the cap, put the Christmas Tree into the cap and fasten it by an ordinary plasticine.
Straighten the twigs - the Christmas Tree is ready!
You can also decorate this spruce with Christmas balls and garlands made of beads. Find out how to do that in this tutorial.
P.S. Don't want to miss new tutorials? Subscribe for email notifications of site updates!
If you like this tutorial, share it with your friends on social networks using the buttons below the post.












absolutely wonderful. Super tutorial.
ReplyDeletewow love it and thank you for sharing
ReplyDeleteThank you so much for sharing!!!!!! Simply fantastic!!!!
ReplyDeleteThanks so very must i love them ALL.thank forevery thing. All of your work and time.YOU HAD TO PUT IN EACH ONCE ONE tHANKs. by for now
ReplyDelete