
Winter is in full swing now, so I've got a desire to make a product reminiscent of summer. That is why today we will make fuchsia - an evergreen shrub.
We will need:
- seed beads #11 of burgundy and white colors for flowers;
- seed beads #8 of green color for leaves;
- wire 0.2 mm in diameter for flowers and 0.3 mm in diameter for leaves;
- aluminum or copper wire 1.5-2 mm in diameter for stems;
- green thread for winding the stems.
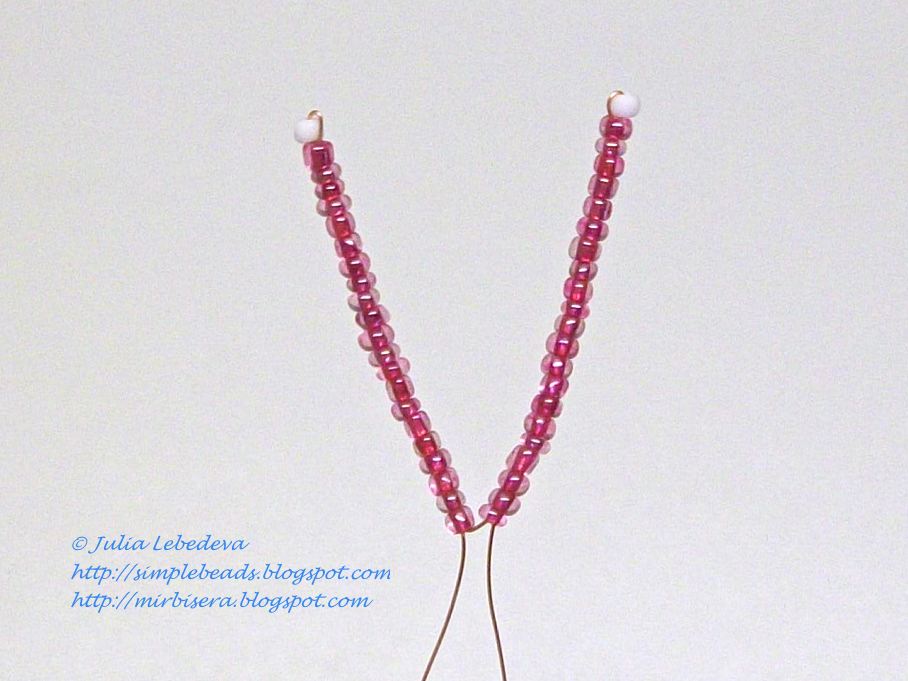
We should make the external petals first. A single flower has four external petals. For each petal take a wire of 80 cm in length.
For the first petal use the parallel weaving technique and the following scheme:
1st row: 1 burgundy bead;
2nd row: 2 burgundy beads;
3rd row: 3 burgundy beads;
4th row: 5 burgundy beads;
5th row: 7 burgundy beads;
6th row: 8 burgundy beads;
rows from 7th to 11th are identical: 10 burgundy beads;
12th row: 9 burgundy beads;
13th row: 8 burgundy beads;
14th row: 7 burgundy beads;
15th row: 6 burgundy beads;
16th row: 5 burgundy beads;
17th row: 4 burgundy beads;
18th row: 3 burgundy beads;
rows from 19th to 23rd are identical: 2 burgundy beads;
rows from 24th to 26th are identical: 2 green beads.
Do not twist together the ends of the wire at the moment.

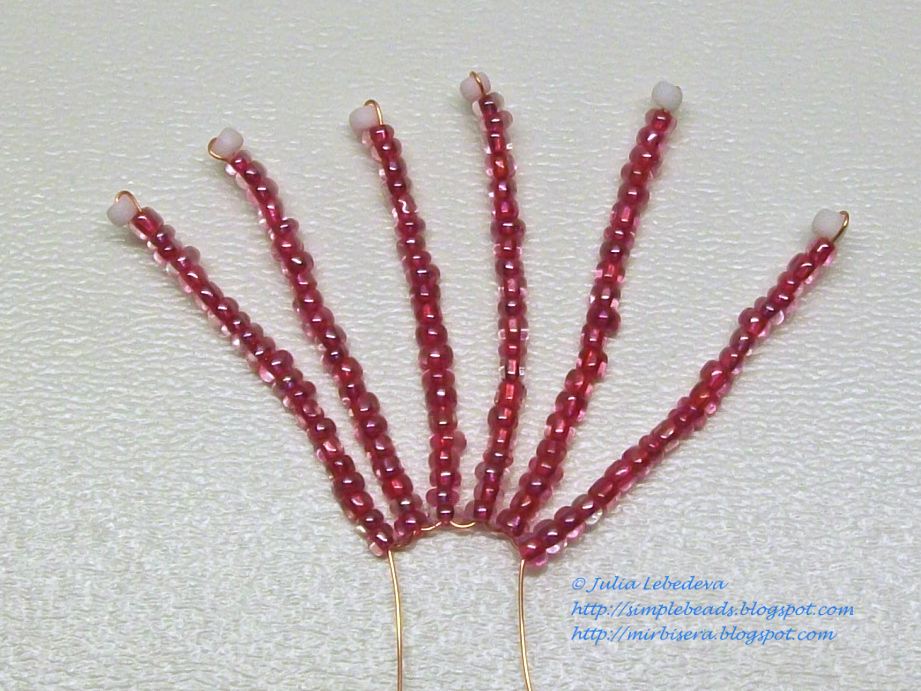
The beginning of the remaining external petals is the same, but we do only the first 16 rows in the each petal. The rest rows in these petals we will add while plaiting the petals to the resulting bud.

Thus we weave 3 incomplete petals, 16 first rows in each.

Such a beading technique when petals are plaited to each other, we have already used before, for example, in the tutorial of doing a bellflower.
Once we have woven the 16th row in the second petal, start to plait this petal to the first one. To do this, pass one wire of the second petal between the 16th and the 17th rows of the first petal.

and then make the other rows of the second petal using the same rows pattern as of the first petal. The main thing to do is to plait the wire of the second petal to the first petal before the each new row.
As the number of beads in the corresponding row is the same in the each petal, we complete the second petal using the following number of beads in rows:
17th row: 4 burgundy beads;
18th row: 3 burgundy beads;
rows from 19th to 23rd are identical: 2 burgundy beads;
rows from 24th to 26th are identical: 2 green beads.
The ends of the wire of the second petal we also leave untwisted.

In the same way we plait in the third petal to the bud.

We've got unused the last external petal. It has only 16 rows at now. We should plait this petal in the flower between the first and the third petals. Pass one wire of the 4th petal between the 16th and the 17th rows at a free side of the first petal. The other wire of the 4th petal pass between the 16th and the 17th rows at a free side of the third petal.

Continue making the next rows of the 4th petal, plaiting the wires of this petal to the neighboring petals before the each new row.

Once we have woven the fourth petal, separately make at the each petal one more row consisting of one green bead. Then separately twist together both wires under the each petal.

Put aside the flower's bud for some time and start weaving the internal petals of the flower.
The internal petals we make out of white beads using the French bead looping technique that is described in the tutorial on beaded violets.
Take a wire of 50 cm in length and bend it twice so that one end of the wire should be about 15 cm in length and the other end of the wire should be about 35 cm in length. Then the long end of the wire twist around the centre of the short end of the wire two or three times. Now we've got a loop with two wires coming out of it.

String 3 white beads onto the short wire (these beads will form the central row of the petal) and 6 white beads onto a long wire (these beads will form the first half of the first circle).

Then using the technique of circular weaving make 4 circles around the central row with the following numbers of beads:
the first circle - 6+6 beads,
the second circle - 11+11 beads,
the third circle - 16+16 beads,
the fourth circle - 20+20 beads.

One internal petal is completed. Bend the short wire inward the petal and cut it off. Twist the long wire along with the original loop.

For the each flower we should make 4 such internal petals.

Put aside these petals for some time and start doing the stamens.
Take a wire of 60 cm in length and string 21 burgundy and 1 white beads onto it.
Place the beads on the wire so that the end of the wire from the side of burgundy beads would be 10 cm in length.

Then, holding the white bead, pass the long wire backwards through all the other beads.

Tighten the wire making sure that the short end of the wire is still 10 cm in length. We've got the needle, it is the first stamen.

Then make another stamen: string 21 burgundy and 1 white beads onto onto the long wire

and, holding the last (white) bead, pass this wire backwards through the other 21 beads.

Move the beads up to the first stamen and tighten the wire.
Similarly make four more stamens on the same end of the wire.
Collect all the stamens along and twist together both ends of the wire.

Now let's assemble the flower. First of all, twist the internal petals to the stamens. At first fasten one petal,

and then fasten the other 3 petals one after another placing them in a circle just below the stamens.


Next, take the internal petals with stamens and insert them into the bud of external petals.


After that twist together all the wires below the bud. A single flower is ready.

Then we should make leaves. I made them out of larger beads than the beads for the flowers, and on a thicker wire, in order that they could keep their shape under their own weight. For each leaf take a wire of 70 cm in length and green beads. Use the parallel weaving technique and adhere to the following pattern:
1st row: 1 bead;
2nd row: 2 beads;
3rd row: 3 beads;
4th row: 4 beads;
5th row: 5 beads;
6th row: 6 beads;
rows from 7th to 15th are identical: 7 beads;
16th row: 6 beads;
17th row: 5 beads;
18th row: 4 beads;
19th row: 3 beads;
20th row: 2 beads;
21st row: 1 bead.

For the first flower I made 8 such leaves and for the each subsequent flower I slightly reduced the number of leaves.

Before we begin the general assembly of the twig with flower we should take a green thread and wind it round the wire below each leaf for the length of about 4 cm.

Now begin assembling the twig of fuchsia. For the base of the twig I took an aluminum wire of 1.5 mm in diameter and 20 cm in length. Fasten the flower to the top of this thick wire, using an additional piece of thin wire. Leave a small distance between the bud and the thick wire so that the top part of the twig could be flexible.

Then take a green thread and wind it round the twig below the flower for the length of about 5 cm.

Next, begin fastening the leaves. The first couple of leaves twist to the twig at the same level. After that continue winding the twig by a green thread.

Then at a some distance from one another fasten to the twig all the other leaves, placing them around. At the same time continue winding the twig by a green thread to hide the wire.

When you have fasten all the leaves continue winding the stem by a green thread till the bottom. Fix the thread by making a knot and trim the excess wires if needed.
One twig of fuchsia is ready.

To get a fuchsia bush, we should make a few such twigs. I made 3 twigs and put them into a pot.

P.S. Don't want to miss new tutorials? Subscribe for email notifications of site updates!
If you like this tutorial, share it with your friends on social networks using the buttons below the post.
No comments:
Post a Comment