
Today we will make a football (in American variation - a soccer ball) out of beads.
We will need:
- seed beads of two colors (I used size 8 seed beads of light-yellow and black colors);
- a wooden or rubber ball to fill the inner space of the beaded ball (for size 8 seed beads you need a ball of 3.8 cm in diameter);
- nylon threads of two colors (the same colors as the colors of beads);
- one or two beading needles (we will use the beading technique of brick stitch, so you can do with one needle only).
A classic football has the shape of truncated icosahedron, which is composed of 20 regular hexagons and 12 regular pentagons. In this figure each pentagon is surrounded by hexagons, and each hexagon borders with three pentagons and three hexagons, and adjacent figures around the perimeter of hexagon alternate.

We will make our ball just the same way. First, we will make 20 hexagons, then 12 pentagons and after that we will connect all the elements so that they form a ball. To weave all the elements we will use the beading technique of brick stitch.
Before I start the tutorial, I want to make some important remarks:
1) Although the concept of this ball is very simple, its implementation is quite time-consuming, requires knowledge of different methods of brick stitch beading technique and, most importantly, requires fine weaving at all stages. So I can not recommend this ball to you for the very first experience in brick stitch. To start weaving this ball, you should already have experience in brick stitch technique and know the methods described in this, this and this tutorials.
2) All the seed beads that are used for weaving should be very neat and equal in size. So don’t use low-quality beads, otherwise your ball will not look smooth and round;
3) I used czech seed beads of #8/0 size, and the finished ball turned to be of 4.4 cm in diameter. If you want your ball to be smaller in size, you should use smaller beads. But the smaller the beads are, the more difficult the process of weaving is. So I recommend to use seed beads of #8/0 size for your first ball. Once you gained experience, for the next balls take seed beads of any size you want.
So, after a brief introduction let’s start weaving.
First, make hexagons. Use seed beads of a light color (preferably the white color, but I used seed beads of light-yellow color) and a nylon thread of the same color. For the each element I used a thread of 70 cm in length.
For the 1st row of a hexagon make a single chain consisting of 3 beads. Start weaving about 20 cm from one end of the thread.
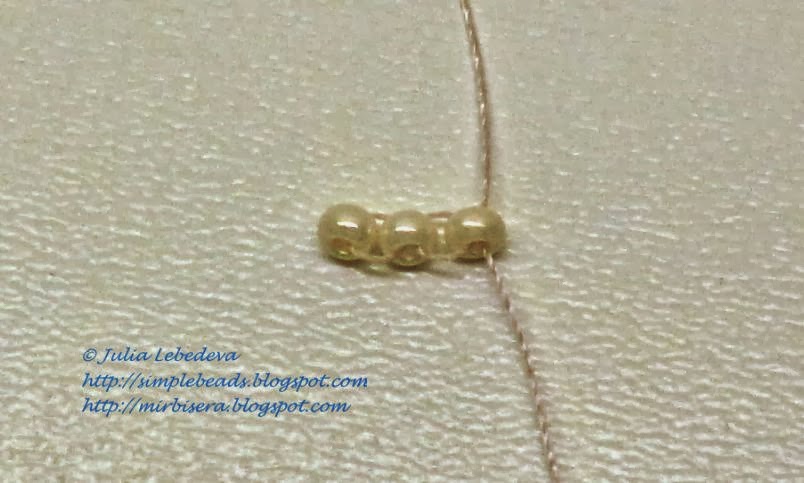
The 2nd row consists of 4 beads. At the beginning of the row string 2 beads at once and at the end of the row add one extra bead.

The 3rd and the 4th rows make in the same way: start with 2 beads together and at the end of the row add one extra bead. So, the 3rd row consists of 5 beads and the 4th row consists of 6 beads.

The each next row is reduced by one bead. At the beginning of the row string only 1 bead and at the end of the row add no extra bead.
So, the 5th row consists of 5 beads, the 6th row consists of 4 beads and the 7th row consists of 3 beads.
Weaving the hexagon is completed. You can fix the remaining ends of the thread if you want, but I left them alone for now and used them later for sewing all the elements to each other.
The shape of the finished hexagon should be very close to regular hexagon. But if a slight deviation exist, it will be leveled at the final stage when all the elements are connected to each other. Since we use a nylon thread for weaving, the finished elements are very flexible and can be reshaped under the tension when they are assembled into the ball.

We should make 20 such single hexagons.
After that, make pentagons. Use seed beads of a dark color (preferably the black color) and a nylon thread of the same color.
Please note: to make the sample pentagon I used a nylon thread of a light color, this trick helped me to take more contrasting photos. But all the pentagons for the ball I weaved using the black thread.
For the 1st row of a hexagon make a single chain consisting of 3 beads. Leave the free end of the thread of at least 15 cm in length (otherwise it will be hard to fix it).

To weave the 2nd row we will use the method that we hasn’t met in our tutorials yet. This row consists of dual beads, so instead of one bead at the each step we will always string two, and they will be placed strictly above the each other. All the other tricks of the brick stitch technique we will use the usual way, but we will apply them to two beads at once.
So, start the 2nd row by stringing onto the thread 4 beads at once and passing the needle under the segment of thread that connects two extreme beads of the 1st row.

Next, pass the needle backwards through the two last added beads

and after that tighten the thread. So we’ve got a dual row.

All the other beads in the row add by two: string onto the thread two beads together, pass the needle in the usual way under the next segment of thread in the 1st row

and then pass the needle backwards through both just added beads.

After that tighten the thread.

At the end of the row add two extra beads at once.

All the other rows in the pentagon are ordinary and consist of single beads. For our convenience, let’s count the last dual row as two rows - the 2nd and the 3rd rows.
The 4th row consists of 5 beads. At the beginning of the row string 2 beads at once and at the end of the row add one extra bead.


The 5th row consists of 3 beads. At the beginning of the row string one bead.

Then we should reduce the number of beads in the row adding one bead in the place sufficient for two beads. Such a technique is described in detail in this tutorial (opens in a new browser tab).

The 3rd bead in the row add in the ordinary way, passing the needle under the segment of thread that connects two extreme beads of the lower row.

The each next row is reduced by one bead. At the beginning of the row string only 1 bead and at the end of the row add no extra bead. So, the 6th row consists of 2 beads and the 7th row consists of only one bead.

Weaving the pentagon is completed. Although this pentagon is not absolutely regular, its shape is rather close to regular pentagon. Existing deviation will be leveled at the final stage when all the elements are connected to each other.
Since we don’t need the remaining ends of the thread any more, fix them by passing in a zigzag manner through several beads and then cut them off. Later, for connecting the elements of the ball we will use a thread of a light color.

We should make 12 such pentagons.
After that proceed to assembling the ball, by linking all the polygons to each other.
First, take one pentagon and, using a thread of a light color, attach hexagons to all its verges.


Then sew to each other all the contacting verges of adjacent hexagons.

After that along the perimeter of the resulting "flower" attach pentagons between all converging verges of hexagons. So attach five pentagons. Now we’ve got a "cap", similar to a turtle.

We should make separately two such "caps" - "turtles". To do them we need to use 10 hexagons and all the 12 pentagons.

Next, out of the remaining 10 hexagons we should make a zig-zag tape. To do it put 5 hexagons in a row at some distance from each other so that their lower verges should be on the same line (these hexagons make up the "1st row of hexagons"). Then, between each two hexagons of "the 1st row" place one more hexagon (so use 4 hexagons to make the "2nd row of hexagons") and the last hexagon put near the extreme hexagon of "the 1st row" on the same line with hexagons of "the 2nd row". After that sew to each other all the contacting verges of adjacent hexagons.

Then attach this zig-zag tape along the perimeter of one of the "turtles".

At this stage we should insert into the resulting beaded cover a wooden or rubber ball that will help our beaded ball to keep its shape.
The diameter of the inner ball should be chosen exactly so that the beaded cover cling it very tightly, otherwise we will not get a perfectly round beaded ball.
Unfortunately, I didn’t find a ball of a suitable diameter and that is why I had made a small trick. I took a smaller ball

and wrapped it with an adhesive plaster to increase its diameter to the desired size.

Insert this inner ball into the bigger beaded element,

cover it with the other beaded element (the 2nd "turtle")

and after that sew both parts of the beaded ball together.
If the diameter of the inner ball is chosen correctly, we will have to sew with tension, but eventually all the polygons will keep the regular shape and the ball will become round.
A beaded football is finished. If you attach a ring for keys to it, you can use it as a keychain.
P.S. If you like this tutorial, share it with your friends on social networks using the buttons below the post.
Don't want to miss new tutorials? Subscribe for email notifications of site updates or follow us on Twitter!
No comments:
Post a Comment