
Today we will make a beaded guitar that can be used as a keychain. For making it we will use the technique of square stitch. We have already used this bead weaving technique for making an Easter Egg.
For making a beaded guitar we will need:
- size 10 seed beads of four colors (I used seed beads of brown, light-beige, black and yellow colors),
- nylon thread and a beading needle,
- a piece of thin plastic or pasteboard that will be used as a gasket between two guitar decks.
As usual, for all the beadwork you will need a very long thread, so I recommend you to take a thread of the convenient length (about 1 meter). As soon as it becomes too short you should secure it, passing in a zigzag manner through several beads, and then trim it. Next, take a new thread, weave it into the beadwork in the same manner and then continue weaving using this new segment of thread.
The guitar consist of two identical decks and a gasket between them. The each deck should be woven separately.
Let’s start weaving a deck. At first stage we should make first two rows. Use the same technique as described in the tutorial on Easter Egg, with only one modification: at now the second row should contain two beads more than the first row. These extra beads are situated at the edges of the row.
Start weaving and string onto the thread five brown beads. Place the set of beads about 20 cm from the free end of the thread.

Cross the needle through the first two beads from the free end of the thread.

Tighten the thread. We’ve got two beads in the 1st row and three beads in the 2nd row.

Then string onto the thread two more brown beads.

Pass the needle through the nearest bead of the upper row,


after that pass it through the bead that lies right below in the lower row and further through the first of just added beads.

Tighten the thread. The last two beads have lain close to the other beads in two rows: the first bead - in the 1st (lower) row and the second bead - in the 2nd (upper) row.

In the same way continue stringing beads by two so that they form two rows of beads. Repeat the last step 5 more times so that the 1st row contains 8 beads and the 2nd row contains 9 beads.

Finish weaving the first two rows: string onto the thread three brown beads,

pass the needle through the nearest bead of the upper row,


after that pass it through the bead that lies right below in the lower row and further through the first of just added beads.

Tighten the thread. We’ve got first two rows of beads. There are 9 beads in the 1st (lower) row and 11 beads in the 2nd (upper) row.

To continue weaving lead the thread out from the extreme bead of the upper row.


Please note: for your convenience before starting a new row place the beadwork so that the thread comes out from the extreme right bead of the last row. To do so turn over the beadwork after the each row.
Now make the 3rd row of beads. This row contains two beads more than the 2nd row. Therefore at the first step (as well as at the last step in the row) string onto the thread two brown beads at once and then pass the needle in the opposite direction through the extreme bead of the previous row.

After that pass the needle through the both just added beads.


Continue adding beads in the 3rd row by one. The next bead is light-beige. String it onto the thread, pass the needle in the opposite direction through the bead that lies directly under this new bead in the previous row

and then pass the needle through the just added bead.

Tighten the thread.

In the same manner add by one 8 more light-beige beads.

To finish the 3rd row string onto the thread two brown beads at once and attach them to the last bead of the 2nd row.

Then don’t forget to pass the needle through the both just added beads.

The 3rd row is finished. It consists of 13 beads: by 2 brown at its both edges and 9 light-beige beads in the middle of the row.

For your convenience turn the beadwork over.

Next, make the 4th row. This row contains two beads more than the 3rd row. Therefore at the first step (as well as at the last step in the row) add two brown beads at once and attach them to the extreme bead at the appropriate side of the previous row. In the middle of the 4th row add 11 light-beige beads by one. At all there are 15 beads in the 4th row.

For your convenience again turn the beadwork over.

The 5th row contains the same quantity of beads of the same color as the previous row. So add all the beads in the 5th row by one.

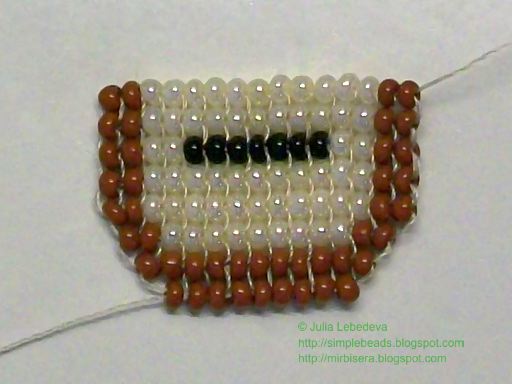
The 6th row also contains 15 beads, therefore add all the beads in this row by one in the following sequence: 2 brown, 2 light-beige, 7 black, 2 light-beige and 2 brown.

The 7th row is the same as the 5th row, so add all the beads in this row by one in the following sequence: 2 brown, 11 light-beige and 2 brown.

The 8th row is the same as the 7th row.

For your convenience don’t forget to turn the beadwork over after completion of the each row.
The 9th row contains two beads less than the previous row. Therefore at the first step (as well as at the last step in the row) add one brown bead and attach it to the two extreme beads at the appropriate side of the previous row. So string a brown bead onto the thread and pass the needle in the opposite direction through the two beads of the previous row at once.


Then pass the needle through the just added bead.


After that in this row add the beads by one. The next bead is brown, then add 9 light-beige beads and 1 brown.

To finish the 9th row string onto the thread one brown bead and attach it to the two extreme beads of the previous row at once.


The 9th row is finished. It consists of 13 beads: by 2 brown at its both edges and 9 light-beige beads in the middle of the row.

Please note: when it is necessary to change the quantity of beads in a row we change it symmetrically at the edges of the row. To increase the quantity we string two beads at once and attach them to the one extreme bead of the previous row, and to reduce the quantity we string one bead and attach it to the two extreme beads of the previous row at once. All the beads in the middle of the row are added by one.
The 10th row contains two beads less than the previous row. Therefore at the first step (as well as at the last step in the row) add one brown bead and attach it to the two extreme beads at the appropriate side of the previous row. At all this row consists of 11 beads: by 2 brown at its both edges and 7 light-beige beads in the middle of the row.

The 11th row contains two beads less than the previous one. It consists of 9 beads: by 2 brown at its both edges and 5 light-beige beads in the middle of the row.

The 12th row is the same as the 11th row, so add all the beads in this row by one.

The 13th row contains two beads more than the previous one. It consists of 11 beads in the following sequence: 2 brown, 2 light-beige, 3 black, 2 light-beige and 2 brown.

So make the other rows using the following pattern:
14th row - 13 beads: 2 brown, 2 light-beige, 5 black, 2 light-beige, 2 brown;
15th row - 13 beads: 2 brown, 2 light-beige, 5 black, 2 light-beige, 2 brown;
16th row - 13 beads: 2 brown, 3 light-beige, 3 black, 3 light-beige, 2 brown;
17th row - 13 beads: 2 brown, 3 light-beige, 3 yellow, 3 light-beige, 2 brown;
18th row - 11 beads: 2 brown, 2 light-beige, 3 yellow, 2 light-beige, 2 brown;
19th row - 9 beads: 3 brown, 3 yellow, 3 brown;
20th row - 7 beads: 2 brown, 3 yellow, 2 brown.

Now we should weave the fretboard. To continue weaving lead the thread out so that it comes out from the nearest yellow bead of the last row.


Continue weaving using the following pattern:
rows from 21st to 31st are identical: 3 yellow beads;
32nd row: 5 brown beads;
rows from 33rd to 35th are identical: 1 brown, 3 yellow, 1 brown beads;
36th row is the last row: 5 brown beads.

Don’t secure the remaining ends of the thread at the moment. We will use them later, to sew both halves of the guitar together.
So make two identical parts of the guitar. To ensure the guitar to be tight, make a gasket out of a thin plastic or pasteboard; it should be a little smaller along a contour than the beadwork.

Put the gasket between the halves of the guitar and sew them together passing the needle through the external segments of thread running between the rows of beads.


So sew the parts of the guitar around the entire perimeter. After that secure the remaining ends of the thread and trim them.
The beaded guitar is finished! If you attach a ring for keys to it, you can use it as a keychain.
P.S. If you like this tutorial, share it with your friends on social networks using the buttons below the post.
Don't want to miss new tutorials? Subscribe for email notifications of site updates or follow us on Twitter!
How can I make the puerto Rican flag in guitar style
ReplyDelete