
Today we will make a horse out of beads. It can be a perfect New Year gift to your family and friends as the Horse is the sign of the coming 2014 year in the Chinese zodiac.
We will need:
- size 8 seed beads of three colors; I used light-yellow, grey and black colors;
- wire 0.3 mm thick;
- thin fishing line and a needle for cross-linking of finished figure.
We use the technique of three-dimensional beading. Each row of the figure consists of two tiers: the upper tiers will form the top side of the head, neck and the back of the horse, and the lower tiers of beads will form the the lower side of its head, neck and the abdomen.
We have already met such a beading technique in our tutorials, so I hope that you are familiar with it. But if this tutorial seems to be too complicated for you, start studying 3-D beading by making more simple products. You can, for example, make a spider - it is quite simple, and its tutorial is detailed enough.
Now, let’s start weaving. Take a wire of 220 cm in length and for the 1st row string 1 black, 1 light-yellow, 1 black and then 3 light-yellow seed beads. Place the set of beads on the middle of the wire.

Take the wire that comes from the black bead and pass it in the opposite direction through 3 light-yellow beads on the other wire.

Tighten the wires trying to keep the beads on the middle of the wire. We've made the first row. The upper tier consists of black beads with a light-yellow bead between them and the lower tier consists of 3 light-yellow beads.

2nd row:
For the upper tier string 4 light-yellow beads onto either one of the wires

and pass the other wire through all these beads in the opposite direction.

Tighten the wires and bend them placing the beads above the lower tier of the 1st row.

Side view:

For the lower tier of the 2nd row string 3 light-yellow beads onto either one of the wires

and pass the other wire through all these beads in the opposite direction.

Tighten the wires and place these beads below the upper tier of the current row.

Side view:

All the following rows we make similarly.
3rd row:
The upper tier: 5 light-yellow beads.
The lower tier: 4 light-yellow beads.

4th row:
The upper tier: string the beads in the following sequence: 1 light-yellow, 1 black, 3 light-yellow, 1 black, 1 light-yellow.
The lower tier: 5 light-yellow beads.

5th row:
The upper tier: 8 light-yellow beads.
The lower tier: 6 light-yellow beads.

6th row:
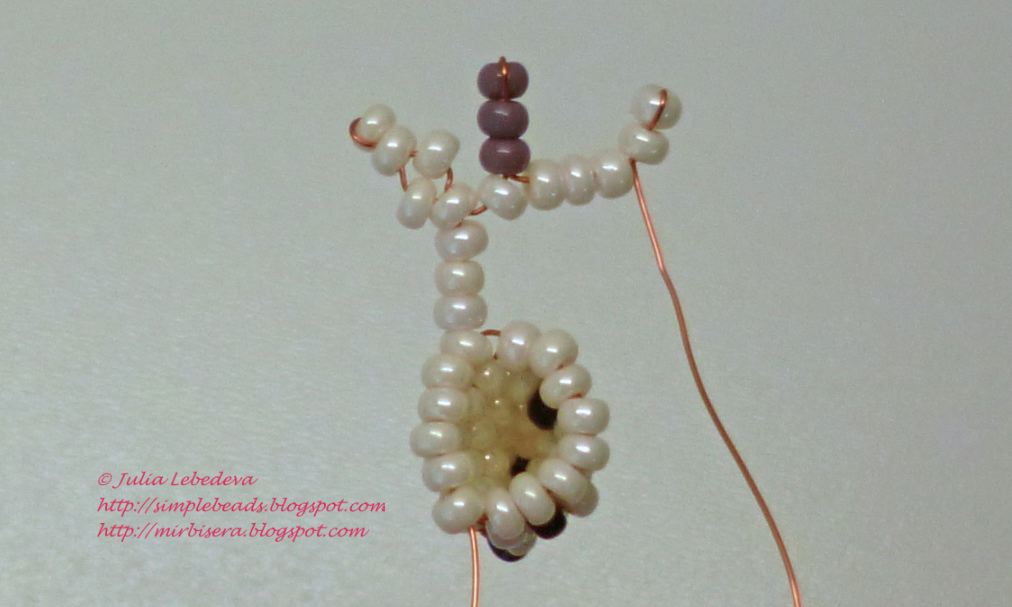
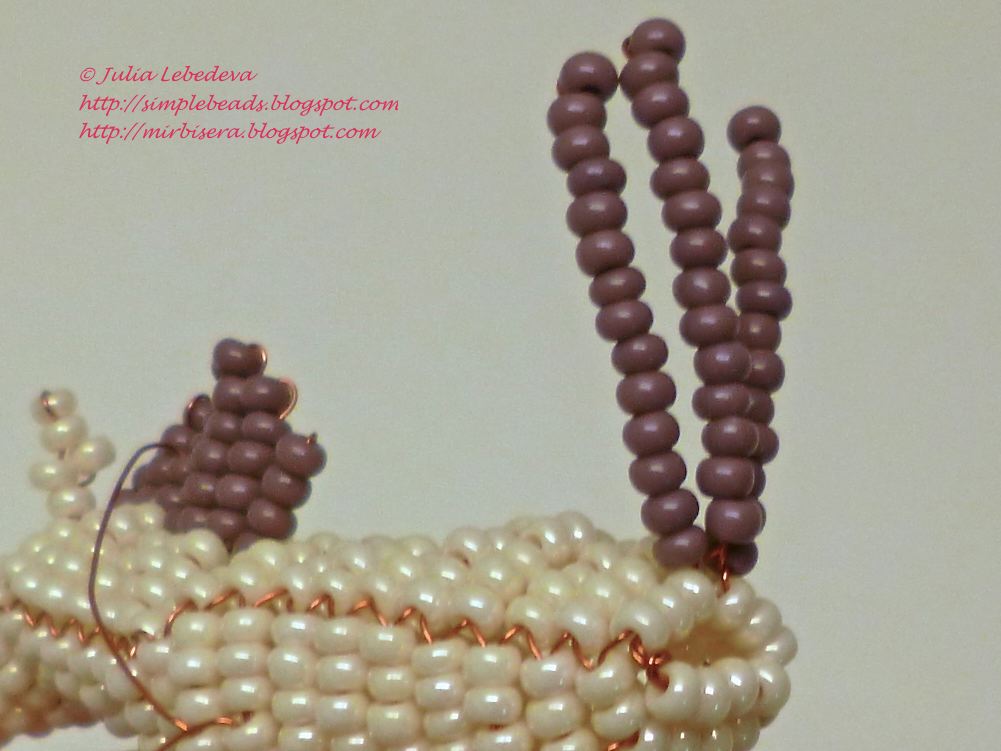
On the upper tier of this row we make the horse’s ears and start making the mane.
First, string 7 light-yellow beads onto either one of the wires.

Then hold the last bead and pass this wire through the nearest bead in the opposite direction.

Move all the beads close to the product and pull the wire.

Then string onto the same wire 1 more light-yellow bead.

Pass this wire in the opposite direction through the middle (4th) bead of the first set of the current tier.

Pull the wire - we’ve got the first ear of the horse.

Then string 1 light-yellow and 3 grey beads onto the same wire.

Hold the last grey bead and pass this wire through the other 2 grey beads in the opposite direction.

Move all the beads of the last set close to the previous beads and pull the wire.
The resulting gray needle is the strand of the horse's mane.

Now string onto the same wire 5 light-yellow beads.

Hold the last bead and pass this wire through the nearest bead in the opposite direction.

Move all the beads of the last set close to the previous beads and pull the wire.
Then string 1 more light-yellow bead onto the same wire

and pass this wire in the opposite direction through the 2nd bead of the penultimate set of the current tier.

Pull the wire - we’ve got the second ear of the horse.

Next, string 3 more light-yellow beads onto the same wire

and pass the other wire through 8 light-yellow beads of the current tier, excluding the beads that make up the ears.

Tighten the wires - the upper tier of the 6th row is finished.

There is no lower tier in this row, that is why we should lead the wires to the lower level. To do so pass each wire through all the beads of the lower tier of the previous row. First, pass either one of the wires,


and then proceed so with the other wire.


Using this method, we reduce the amount of the lower tiers over against the upper ones. Thus we form a bend of the horse's neck.
7th row:
The upper tier: string the beads onto either wire in the following sequence: 5 light-yellow and 4 grey.

Hold the last grey bead and pass this wire through the other 3 grey beads in the opposite direction.

Move all the beads close to the product and pull the wire.

Then string onto the same wire 5 light-yellow beads

and pass the other wire through all light-yellow beads of the current tier.

Tighten the wires - the upper tier of the 7th row is finished. There is another strand of the horse's mane on this tier.

The lower tier of the 7th row: 6 light-yellow beads.

Side view at this stage:

We continue weaving. In the following five rows in the middle of the top tier of each row we make a similar gray strand of the mane.
8th row:
The upper tier: 5 light-yellow beads, 5 grey beads for the mane and then 5 more light-yellow beads.
The lower tier: 6 light-yellow beads.

9th row:
The upper tier: 4 light-yellow beads, 6 grey beads for the mane and then 4 more light-yellow beads.
The lower tier: 6 light-yellow beads.

10th row is the same as the 9th:
The upper tier: 4 light-yellow beads, 6 grey beads for the mane and then 4 more light-yellow beads.
The lower tier: 6 light-yellow beads.

11th row:
The upper tier: 4 light-yellow beads, 5 grey beads for the mane and then 4 more light-yellow beads.
The lower tier: 7 light-yellow beads.

12th row:
The upper tier: 4 light-yellow beads, 4 grey beads for the mane and then 4 more light-yellow beads.
The lower tier: 9 light-yellow beads.

13th row:
There is no upper tier in this row, so we should lead the wires to the upper level. To do so pass each wire through all the beads of the upper tier of the 12th row. First, pass either one of the wires,


and then proceed so with the other wire.


Using this method, we reduce the amount of the upper tiers over against the lower ones. Thus we form a bend of the horse's neck, but in the other direction, at the point where the horse’s abdomen starts.
Make the lower tier of the 13th row: 11 light-yellow beads.

14th row:
The upper tier: 8 light-yellow beads.

For the lower tier string onto the either wire 13 light-yellow beads, pass the other wire through them, but do not pull the wires tight at the moment.

Take an additional piece of wire of 35 cm in length and pass it through the 7 middle beads of the current tier.

Tighten the basic wires and continue weaving on them. We will use additional wires later, for weaving the horse’s forelegs.

Side view at this stage:

15th row is the same as the 14th:
The upper tier: 8 light-yellow beads.
The lower tier: 13 light-yellow beads. Through the 7 middle beads of the current tier pass another additional piece of wire of 35 cm in length.

Tighten the basic wires and continue weaving on them. We will use additional wires later, for weaving the horse’s forelegs.

16th row:
The upper tier: 8 light-yellow beads.
The lower tier: 13 light-yellow beads.

17th row is the same as the 16th:
The upper tier: 8 light-yellow beads.
The lower tier: 13 light-yellow beads.

18th row:
The upper tier: 8 light-yellow beads.
The lower tier: 12 light-yellow beads.

19th row:
The upper tier: 9 light-yellow beads.
The lower tier: 12 light-yellow beads.

20th row:
The upper tier: 9 light-yellow beads.
The lower tier: 12 light-yellow beads. Through the 6 middle beads of the current tier pass one more additional piece of wire of 35 cm in length.

Tighten the basic wires and continue weaving on them. We will use additional wires later, for weaving the horse’s hind legs.

21st row:
The upper tier: 8 light-yellow beads.
The lower tier: 10 light-yellow beads.

22nd row:
The upper tier: 8 light-yellow beads.
The lower tier: 7 light-yellow beads. Through the 3 middle beads of the current tier pass the last additional piece of wire of 35 cm in length.

Tighten the basic wires and continue weaving on them. We will use additional wires later, for weaving the horse’s hind legs.

23rd row is the last row of the horse’s body.
On the upper tier of this row we make the horse’s tail.
Compare two basic wires and choose the longer one. String 3 light-yellow and 14 grey beads onto this wire.

Hold the last grey bead and pass this wire through the other 13 grey beads in the opposite direction.

Move all the beads close to the product and pull the wire.

Then string 14 grey beads onto the same wire.

Again, hold the last bead and pass this wire in the opposite direction through the other 13 beads.

Move all the beads of the last set close to the previous beads and pull the wire.

In the same way make one more needle of 14 gray beads on this wire.

Then string 3 light-yellow beads onto the same wire.

Pass the other wire through 6 light-yellow beads of the current tier and tighten the wires.

The lower tier of the 23rd row: 4 light-yellow beads.

Weaving the horse’s body is finished. We should fix the wires.
Pass either one of the wires through all light-yellow beads of the upper tier of the penultimate row,


then twist together both wires and cut them off.

Hide the tip of the wires inside the figure.
Side view at this stage:

Now we make the legs of the horse. We weave them using the same technique of three-dimensional beading.
For the each foreleg use the following pattern:
1st row:
The upper tier: 1 light-yellow bead.
The lower tier: 2 light-yellow beads.

2nd row:
The upper tier: 2 light-yellow beads.
The lower tier: 2 light-yellow beads.

The next 3 rows (from 3rd to 5th) are the same:
The upper tier: 2 light-yellow beads.
The lower tier: 2 light-yellow beads.
6th row:
The upper tier: 2 light-yellow beads.
The lower tier: 2 black beads.
7th row - only upper tier: 2 black beads.

Side view of the foreleg:

Fix the wire. Pass either one of the wires through all the beads of the lower tier of the penultimate row,

then twist together both wires and cut them off.

Bend the tip of the wires and hide it between the rows of beads.

For the each hind leg use the following pattern:
Rows from 1st to 3rd:
The upper tier: 3 light-yellow bead.
The lower tier: 3 light-yellow beads.
Rows 4th and 5th:
The upper tier: 2 light-yellow beads.
The lower tier: 2 light-yellow beads.
6th row:
The upper tier: 2 light-yellow beads.
The lower tier: 2 black beads.
7th row - only upper tier: 2 black beads.

Side view of the hind leg:

So we make two front and two hind legs of the horse.
Weaving is completed, but the horse keeps bad shape yet.

To provide the toughness to the figure we should sew it with a thin fishing line.
To do this, we use the technique of cross-linking which is described in detail here.
We should sew only the head and the body of the horse, without legs.
At last, straighten the mane and the tail. You can also slightly bend the horse’s legs to give them a more natural position.
The beaded horse is finished!
P.S. Don't want to miss new tutorials? Subscribe for email notifications of site updates!
If you like this tutorial, share it with your friends on social networks using the buttons below the post.
No comments:
Post a Comment