
Today we'll make a beaded pug-dog.
We will need:
- size 10 seed beads of two colors; I used light-beige and black colors;
- wire 0.2 mm in diameter;
- thin nylon line and a beading needle for cross-linking of finished figure.
To make a pug-dog we will use a 3-D beading technique in which the rows of beads are placed in two tiers. We met such a beading technique in our tutorials many times, so I hope that you are familiar with it. But if this tutorial seems to be too complicated for you, start studying 3-D beading by making more simple products. You can, for example, make a spider - it is quite simple, and its tutorial is detailed enough.
Now the upper tiers of beads will form the back of the dog, and the lower tiers of beads - its tummy.
Let’s start weaving. For dog’s body take a wire of 120 cm in length.
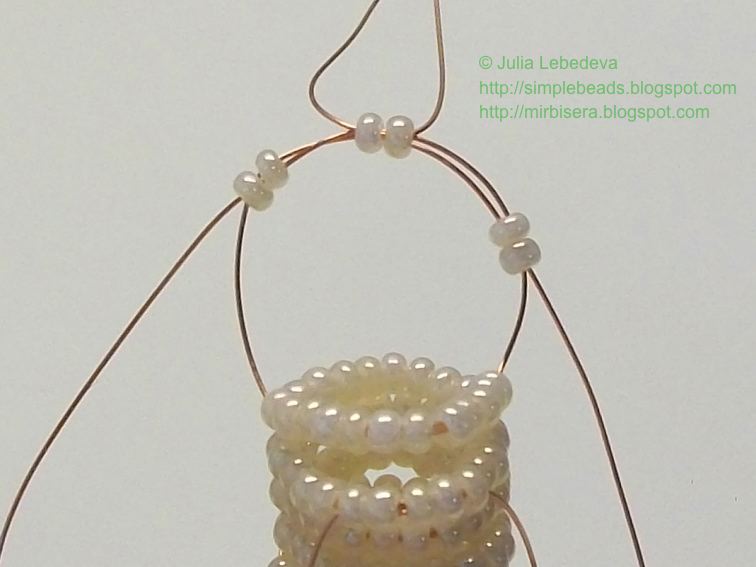
Make 1st row:
The upper tier: 5 black beads.
The lower tier: 5 black beads.

Next, make the middle tier between the upper and lower tiers of the 1st row. String 3 black beads onto any end of the wire

and pass this end of the wire through all the beads of the lower tier in direction from the side of the other end of the wire.

Tighten the wire, placing these 3 beads between the upper and lower tiers of the 1st row.

Side view:

All the other rows have only two tiers in each row.
2nd row:
For the upper tier string the beads in the following sequence: 1 black, 1 light-beige, 1 black, 3 light-beige, 1 black, 1 light-beige, 1 black.
The lower tier: 6 black beads.

3rd row:
For the upper tier string onto any end of the wire 12 light-beige beads, pass the other end of the wire through them, but do not pull the wires tight at the moment.

Take an additional piece of wire of 20 cm in length and pass it through the 4 middle beads of the current tier.

Tighten the basic wires and continue weaving on them. We will use the additional wire later, for weaving the dog’s ears.

The lower tier of the 3rd row: 10 light-beige beads.

4th row:
Make the upper tier of 12 light-beige beads, but do not pull the wires tight at the moment.

Take another additional piece of wire of 20 cm in length and pass it through the 4 middle beads of the current tier.

Tighten the basic wires and continue weaving on them. We will use the additional wire later, for weaving the dog’s ears.

The lower tier of the 4th row: 14 light-beige beads.

5th row:
The upper tier: 11 light-beige beads.
The lower tier: 16 light-beige beads. Through the 6 middle beads of the current tier pass one more additional piece of wire of 30 cm in length. We will use this additional piece of wire later, for weaving the dog’s forepaws.


Side view at this stage:

6th row:
The upper tier: 10 light-beige beads.
The lower tier: 16 light-beige beads. Through the 6 middle beads of the current tier pass one more additional piece of wire of 30 cm in length. We will use this additional piece of wire later, for weaving the forepaws.

7th row:
The upper tier: 9 light-beige beads.
The lower tier: 16 light-beige beads.

8th row:
The upper tier: 8 light-beige beads.
The lower tier: 15 light-beige beads.

9th row:
The upper tier: 8 light-beige beads.
The lower tier: 14 light-beige beads.

10th row:
The upper tier: 9 light-beige beads.
The lower tier: 13 light-beige beads.

11th row:
The upper tier: 9 light-beige beads.
The lower tier: 15 light-beige beads. Through the 5 middle beads of the current tier pass one more additional piece of wire of 30 cm in length. We will use this additional piece of wire later, for weaving the hind paws of the dog.


12th row:
The upper tier: 8 light-beige beads.
The lower tier: 12 light-beige beads.

13th row:
The upper tier: 6 light-beige beads. Through the 2 middle beads of the current tier pass the last additional piece of wire of 20 cm in length. We will use this additional piece of wire later, for weaving the dog’s tail.
The lower tier: 8 light-beige beads.

14th row:
Only one tier: 4 light-beige beads. Place these beads in the middle between the upper and lower tiers of the previous row.

The rest of the basic wire we will use for weaving the dog’s hind paws. That is why we should lead both ends of the wire to the lower level. To do so pass each end of the wire downwards through 2 extreme beads of the lower tier of the previous row. First, pass one end of the wire,


and then proceed so with the other end of the wire.

At now the ends of the basic wire come out from the beads of the lower tier of the 13th row, and there are 4 beads between them.

Weaving the body of the pug-dog is finished. Next, make the ears using the additional wires in the 3rd and 4th rows.
Weave them using the technique of flat parallel weaving and the following pattern:
1st row: 2 black beads.
2nd row: 2 black beads.
3rd row: 1 black bead.

Fix the wire: pass any end of the wire through the beads of the penultimate row,

then twist together both ends of the wire and cut them off. Bend the tip of the wire and hide it between the rows of beads.

So make two ears of the pug-dog.

Next, make forepaws, using additional wires in the 5th and 6th rows. For weaving all the paws use the technique of three-dimensional beading.
Make each forepaw using the following pattern:
1st row:
The upper tier: 2 light-beige beads.
The lower tier: 2 light-beige beads.

Side view:

2nd row:
The upper tier: 2 light-beige beads.
The lower tier: 1 light-beige bead.

Side view:

3rd row:
The upper tier: 1 light-beige bead.
The lower tier: 1 light-beige bead.

Side view:

Then string 5 light-beige beads onto any end of the wire.

Pass this end of the wire through the bead of the lower tier of the 3rd row in direction from the side of the other end of the wire.

Tighten the wire.

The forepaw is finished. Fix the wire: pass any end of the wire through the bead of the lower tier of the 2nd row,

then twist together both ends of the wire and cut them off.

Bend the tip of the wire and hide it between the rows of beads.

So make two forepaws of the pug-dog.

Next, make hind paws, using an additional wire in the 11th row and the rest of the basic wire.
Make each hind paw using the following pattern:
1st row:
The upper tier: 4 light-beige beads.
The lower tier: 3 light-beige beads.
2nd row:
The upper tier: 3 light-beige beads.
The lower tier: 2 light-beige beads.
3rd row:
The upper tier: 2 light-beige beads.
The lower tier: 1 light-beige bead.
4th row:
The upper tier: 1 light-beige bead.
The lower tier: 1 light-beige bead.

Side view:

Then string 5 light-beige beads onto any end of the wire.

Pass this end of the wire through the bead of the lower tier of the 4th row in direction from the side of the other end of the wire.

Tighten the wire.

The hind paw is finished. Fix the wire.


So make two hind paws of the pug-dog.

Next, using an additional wire in the 13th row of the body make the dog’s tail.
Weave it using the technique of flat parallel weaving and the following pattern:
1st row: 2 light-beige beads;
2nd row: 2 light-beige beads;
3rd row: 1 light-beige bead;
4th row: 1 light-beige bead.

Fix the wire: pass any end of the wire through the bead of the penultimate row of the tail,

then twist together both ends of the wire and cut them off. Bend the tip of the wire and hide it between the rows of beads.

Weaving the pug is finished.

If there are visible gaps between the rows of beads, you can sew the figure with a thin nylon line. To do so, use the technique of cross-linking which is described in detail here. You should sew only the body and the head of the pug. It is not necessary to sew the ears, paws and tail.
The beaded pug is ready!

P.S. If you like this tutorial, share it with your friends on social networks using the buttons below the post.
Don't want to miss new tutorials? Subscribe for email notifications of site updates!
how cute pug !
ReplyDeletei made it with small tiny beads and wire and the pug turned out so cute and small i would make so many it took me 3 hours
ReplyDelete